
Experiment 9 - Arenediazonium Salts
Objective
In this experiment, the use of one of the more specialized aromatic reactions, diazonium salts, is examined.Introduction
During the study of the chemistry of aromatic compounds, several reactions are encountered that allow for halogenation (Cl and Br only), nitration, alkylation, and acylation of the aromatic ring. Also, one is introduced to the influence of substituents on the ring, i.e., groups that are ortho-para directors, or meta directors. However, as one looks through the lecture text, it is apparent that various other substituents are seen in aromatic systems (OH, CN, I, etc.) and substitution patterns that do not fit the norm also are observed. These groups are usually added to the aromatic ring via more specific types of reactions. Arenediazonium salts are generated by the reaction of a primary amine with nitrous acid (produced from sodium nitrite) as shown below. The aromatic amines (anilines) are generated by the reduction of the corresponding nitro compound, which is easily prepared via electrophilic nitration of the ring (see nitration of methyl benzoate). The diazonium salts are unstable at temperatures above 5 - 10°C and some explode if allowed to dry. The aliphatic counterpart can be prepared in the same way; however, even at low temperature it is more unstable and can spontaneously decompose by loss of nitrogen to produce carbocation.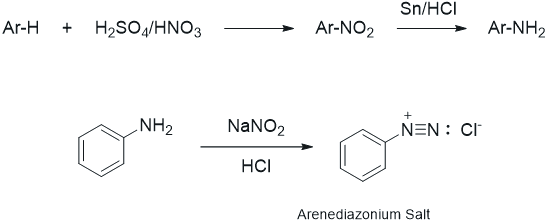
Figure 1
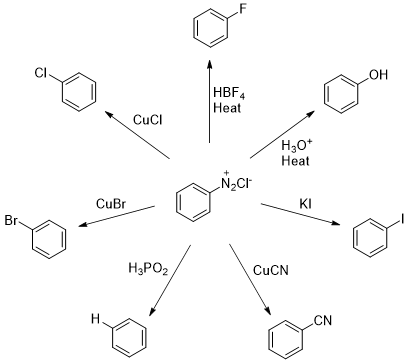
Figure 2
Figure 3

Figure 4
Pre-Lab
Complete the pre-lab assignment in WebAssign.Procedure
1
In a 50 mL Erlenmeyer flask, weigh 0.25 g of ethyl 4-aminobenzoate (benzocaine) and dissolve it in 3 mL of water plus 1 mL of 6 M HCl.
Note: Warmth from the palm of your hand may be required for complete solution formation.
2
Next, cool the solution for 5-10 minutes in an ice bath. Keep the solution moving to prevent freezing.
3
Meanwhile, in a small test tube, prepare a solution of 0.115 g of sodium nitrite in 1 mL of water.
4
Slowly add the sodium nitrite solution to the ethyl 4-aminobenzoate solution using a Pasteur pipet while continuing to chill.
5
Keep the resulting solution cold in an ice bath and swirl the contents intermittently for a period of 5-10 minutes.
6
Meanwhile, prepare a solution of 0.5 g of potassium iodide in 1 mL of water in a small test tube.
7
Cool this solution in an ice bath for 5-10 minutes.
8
Using a Pasteur pipet, slowly add the potassium iodide solution to the cold solution of the diazonium salt continuing to swirl.
9
Allow the reaction mixture to slowly warm to room temperature (swirl occasionally) over a period of 10-15 minutes.
10
Prepare to extract the reaction mixture with a separatory funnel. Here is a video that shows you how to do a liquid-liquid extraction.
11
Make sure the stopcock on the separatory funnel is closed.
12
Pour the reaction mixture into the separatory funnel.
13
Measure approximately 10 mL of diethyl ether and transfer it to your separatory funnel.
14
Stopper the funnel, wrap your fingers over the stopper as demonstrated by your TA, invert the funnel, pointing it away from you and your lab partner, and release the pressure IMMEDIATELY by opening the stopcock.
15
Continue extraction with ether by closing the stopcock, shaking, inverting, and venting until no audible or visible gas emerges (i.e., no bubbles, liquid, or sound comes out when venting).
16
Place the separatory funnel in an iron ring on a ring stand and remove the stopper IMMEDIATELY to prevent residual pressure buildup from ejecting it and your sample.
Note: The determination of which layer is organic and which is aqueous can be accomplished by comparing the densities of the solvents used. Or you can add a drop of water to the separatory funnel and observe whether it dissolves in the upper layer or passes through to the lower one.
17
Remove the aqueous layer (which is it, top or bottom?) into a labeled beaker via the stopcock. SLOW to dropwise flow as the level of the layer approaches the stopcock. Leave a drop of water with the ether layer to avoid losing any ether, and with it, your product.
18
Next, extract the ether layer with 7.5 mL of a 10% hydrochloric acid (HCl) solution by following the previous steps.
19
Then, prepare to extract with a basic solution by rinsing your measuring glassware with 1-2 mL of saturated sodium bicarbonate (NaHCO3). This prevents neutralization of the next quantity of sodium bicarbonate (NaHCO3) measured and is called conditioning.
20
Discard the rinse.
21
Measure 7.5 mL of saturated sodium bicarbonate (NaHCO3) with your conditioned glassware.
22
Extract the ether layer with the sodium bicarbonate (NaHCO3) solution by following the previous steps.
Important: Quickly open the stopcock at first inversion. Then agitate gently at first, since pressure buildup from the carbon dioxide, generated by neutralization of the sodium bicarbonate, occurs VERY readily.)
23
Finally wash your ether solution with 7.5 mL of a saturated sodium thiosulfate (Na2S2O3) solution following the same extraction procedure.
24
At the end of this last extraction, allow a drop of the ether layer to transfer from the separatory funnel with the water. Doing this minimizes the amount of water contaminant in your final isolated product.
25
Place the ether solution in a clean dry 50 mL Erlenmeyer flask.
26
Add a small amount of anhydrous sodium sulfate (enough to cover the bottom of the flask) to dry the organic solution. Here is a video that shows you how to use anhydrous sodium sulfate to remove the water.
27
Allow the solution to dry for 5 minutes.
28
Then decant (or filter) the ether solution to remove the drying agent.
Note: You may use a small amount of ether, ~5 mL, to rinse the drying agent.
29
Check for purity of the product by TLC analysis (here is a video that shows you how to run a TLC plate).
-
aPlace 5 mL of hexane:acetone, 7:3 in a TLC chamber.
-
bAdd a piece of filter paper vertically to act as a wick.
-
cAllow the chamber to equilibrate for 15 minutes before use.
-
dPrepare the TLC plate by lightly drawing a pencil line 1 cm from the bottom and 1 cm from the top. (Do not scrape the plate.)
-
eMake a spot of the product solution on the starting line and a spot of the standard starting material solution on the TLC plate.
-
fDevelop the plate and calculate the Rf value of your product and starting material.
30
Concentrate your product solution by placing it on hotplate set at 85°C and heating it until only an oil remains.
31
Determine the yield and percentage yield of the reaction.
32
Perform an infrared analysis on your product and compare the spectrum to that of the starting material.
In-Lab Questions
Download and print the following worksheet. You will use this worksheet to record your answers to the In-Lab questions.
Questions
Record the following data.- Question 1: Amount of ethyl 4-aminobenzoate used _________________ g, _________________ mol
- Question 2: Amount of sodium nitrite used ___________________ g, ___________________ mol
- Question 3: Amount of potassium iodide used ___________________ g, ___________________ mol
- Question 4: Amount of ethyl 4-iodobenzoate produced _________________ g, _________________ mol
- Question 5: Theoretical yield of ethyl 4-iodobenzoate _________________ mol, _________________ g
- Question 6: Percentage Yield _______________________
- Question 7: Record your calculations.
- Question 8: What was the Rf value of the starting material? Of the product? Which one is the more polar?
- Question 9: You used infrared spectroscopy as a means to determine the absence of any starting material in the product. What infrared stretches were used?