Volumetric Glassware
In quantitative chemistry, it is often necessary to make volume measurements with an error on the order of 0.1%, one part per thousand. This involves using glassware that can contain or deliver a volume known to a few hundredths of a milliliter, or about 0.01 mL. One can then report quantities greater than 10 mL to four significant figures.
Glassware designed for this level of accuracy and precision is expensive, and requires some care and skill to give best results. Four main types of volumetric glassware are common: the graduated cylinder, the volumetric flask, the buret and the pipet. These have specific uses and will be discussed individually. There are some points that are common to all types, however. These involve cleanliness and how to read volumes accurately.
Cleanliness is essential to good results. Chemically clean glass supports a uniform film of water, with no hanging droplets visible. Rinse your glassware thoroughly with deionized water when you are finished with it. If you are suspicious at all, wash it before you use it as well. With some types of glassware, one "conditions" the apparatus by rinsing with a few small portions of the solution one will be measuring prior to conducting the actual work. This prevents water droplets from diluting one's solution, and changing the concentration. More detail on how to do this will be given in the discussion of the individual pieces of glassware.
All volumetric glassware is calibrated with markings used to determine a specific volume of liquid to varying degrees of accuracy. To read this volume exactly, the bottom of the curved surface of the liquid, the meniscus, should be located at the scribed line for the desired volume. It is often easier to see the meniscus if you put a white paper or card behind the apparatus. If your eye is above or below the level of the meniscus, your readings will be inaccurate due to the phenomenon of parallax. View the meniscus at a level perpendicular to your eye to avoid this as a source of error.
TC Versus TD
Some volumetric glassware bears the label "TC 20°C" which stands for "to contain at 20°C." This means that at 20°C, that flask will have precisely the volume listed inside it. If you were to pour out the liquid, you would need to get every drop out of it to have that volume.
Alternatively, some volumetric glassware bears the label "TD 20°C" which stands for "to deliver at 20°C." This means that at 20°C, precisely the volume listed will leave it when the contents are allowed to drain out of the vessel. It is not necessary to get every last drop and, in fact, it is inaccurate to blow the last bit out of a volumetric pipet.
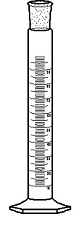
Graduated Cylinders
Most students are familiar with graduated cylinders, which are used to measure and dispense known volumes of liquids. They are manufactured to contain the measured volume with an error of 0.5 to 1%. For a 100 mL graduated cylinder, this would be an error of 0.5 to 1.0 mL. Measurements made with a graduated cylinder can be reported to three significant figures.
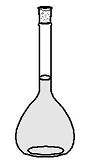
Volumetric Flasks
Watch the movie on using a volumetric flask.
The volumetric flask, available in sizes ranging from 1 mL to 2 L, is designed to contain a specific volume of liquid, usually to a tolerance of a few hundredths of a milliliter, about 0.1% of the flask's capacity. The flask has a calibration line engraved on the narrow part of its neck. It is filled with liquid so the bottom of the meniscus is on this engraved line. The calibration line is specific to a given flask; a set of flasks built to contain the same volume will have lines at different positions.
Volumetric flasks are used to make solutions with very accurately known concentrations. There are two ways to do this. One can start with a solid solute or with a concentrated stock solution.
When working with a solid solute, one weighs the material to the desired accuracy and transfers it carefully and completely to the volumetric flask. If solute is lost in transfer, the actual concentration of the resulting solution will be lower than the calculated value. Therefore, one weighs the solid in a beaker or other glassware that can be rinsed with the solvent, typically water, and transfers it into the flask. Additional solvent is added, but not enough to fill the wide part of the flask. The solute is dissolved by swirling the flask, or by stoppering it and inverting it repeatedly. Once the solute is dissolved, more solvent is added to bring the volume to the mark on the flask. The last portion should be added very carefully, dropwise, so the bottom of the meniscus is at the mark. The flask is then stoppered and inverted a few times to completely mix the solution.
When diluting a stock solution, the desired volume of solution is transferred into the flask via a pipet. The solvent is then added as described above. Obviously, the concentration of the stock solution must be accurately known to as many significant figures as one desires for the dilute solution. Also, the volume transferred must be known to the desired number of significant figures.
Never fill a volumetric flask with solvent and then add solute. This results in overfilling the flask, and the volume will not be known accurately. It is sometimes useful to have some solvent in the flask before adding the solute. This is a good practice when dealing with volatile solutes.
Volumetric flasks are not used for storage of solutions. Once the solution is prepared, it is transferred to a clean, labeled bottle or beaker. The flask is then washed and rinsed well. The last few rinsings should be with deionized water
Burets
A buret is a long, narrow tube with a stopcock at its base. It is used for accurately dispensing variable volumes of liquids or solutions. It is graduated in 0.1 mL increments, with the 0.00 mL mark at the top and the 50.00 mL mark near the bottom. Notice that the marks do not go all the way to the stopcock. Therefore the buret actually will hold more than 50.00 mL of solution. Burets with liquid capacities of 25.00 mL and 10.00 mL are also available.
Watch the movie on cleaning and conditioning a buret.
For optimal accuracy and to prevent contamination, a buret must be clean. To test a buret for cleanliness, close its stopcock and pour a small volume (5-10 mL) of deionized water into it. Hold the buret at a slant, almost parallel to the desk surface. Slowly rotate the buret and allow the liquid to coat its inside surface. Then hold it upright; the liquid should settle to the bottom of the buret in sheets, leaving no droplets on the interior walls. If droplets form on the walls, wash the inside with a soap solution, and rinse with distilled or deionized water. Repeat the cleanliness test.
Just before use, a buret should be "conditioned" to ensure that any water adhering to the inside walls is removed. Add ~5 mL of the liquid that is to be used into the buret. Rinse the walls of the buret, then drain the liquid through the stopcock. Repeat with a second volume of liquid.
The buret can now be filled with solution. Do this carefully and avoid trapping air bubbles in the tube. You may need a small funnel. The liquid level can be above the 0.00-mL mark. Clamp the filled buret in place if this was not done prior to filling; it is sometimes easier to hold the buret while filling it. Open the stopcock and drain enough liquid to fill the buret's tip. Have a beaker for waste solution handy for this and similar operations. There should be no bubbles in the tube or tip of the buret. These will lead to volume errors. If there are bubbles in the tube, carefully tap the buret to free them. Use the stopcock to force bubbles out of the tip. It may be necessary to empty and refill the buret.
Watch the movie on titration.
When the buret is clean and bubble-free, drain the liquid until the meniscus (the bottom of the curved surface of the liquid) is at or slightly below the 0.00-mL mark. It is not necessary to align the meniscus exactly at the 0.00-mL mark since the difference between the initial and final volumes is the desired measurement. If there is a drop of liquid clinging to the buret tip, remove it by gently touching the tip to a glass surface, such as the edge of the waste beaker or wiping with a Kimwipe. The volume of a drop is about 0.1 mL, the same volume as the buret's graduations.
Find the bottom of the meniscus, and read the liquid level in the buret to the nearest 0.01 mL at that point. This will take a little practice. Remember, you are reading from the top down. Record this value as the initial volume. Although it is tricky to "read between the lines," remember that the last digit of a measurement is expected to have some uncertainty! One-fifth (1/5) of a division (0.02 mL) can be reproducibly estimated if the meniscus is between calibration marks, after a little practice.
Now dispense the liquid you need. If you are using the buret to measure a set amount of liquid, determine what the final reading should be to obtain that amount. Dispense the liquid slowly into the receiving vessel. Remember, in a clean buret, water will coat the interior walls and drain slowly. After closing the stopcock catch any hanging droplet in the receiving vessel. It is part of the measurement at this point, so do not catch it in the waste container. Wait a few seconds for the meniscus to stabilize, then read and record the final volume to the nearest 0.01 mL. The difference between the initial and final readings is the volume you dispensed. When using a buret, it is easier to work with the exact volume dispensed than to try to dispense an exact volume. Plan your work with this in mind.
Although burets are sometimes used as dispensers, they are far more frequently used in procedures called titrations. In a titration, one attempts to determine an equivalence point as exactly as possible. This usually involves the first persistent color change of an indicator. With a little practice, one can dispense fractions of drops (less than 0.1 mL) into the titration vessel, and reproduce results within 0.10 mL or less.
Watch the movie on cleaning a buret.
When finished using a buret, drain the remaining liquid and clean it carefully. Finish with several rinses of deionized water including the stopcock and tip. If solute dries in the buret, it can be very difficult to remove. Clamp the buret in the buret clamp upside down with the stopcock open so that it will dry for the next lab session.
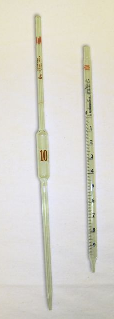
Pipets
Watch the movie on pipeting techniques.
Pipets are designed to deliver a known volume of a liquid. Their volumes range from less than 1 mL to about 100 mL. There are several types, which vary in accuracy and in the type of task for which they are optimum.
-
Volumetric pipets are meant to hold a single, specific volume. This type of pipet is a narrow tube with a "bubble" in its center, a tapered tip for delivery of liquid, and a single graduation mark near the top (opposite the tapered end) of the tube. Volumetric pipets, sometimes called transfer pipets, are the most accurate pipets. They generally deliver the specified volume ±0.1%, an error of a few hundredths of a milliliter.
-
Most volumetric pipets are marked TD (to deliver) and are drained by gravity. If a drop remains on the tip of the pipet, it is touched gently to the receiving vessel to draw off the remaining liquid or wipe with a Kimwipe. This type of pipet is not designed have residual liquid forced out by blowing.
-
Mohr pipets, also called measuring pipets, are straight tubes with graduations (usually at 0.10-mL intervals) and a tapered end. Mohr pipets are not designed to be drained completely. The operator fills them to a certain level, then dispenses the desired amount of liquid. They are much like burets and can be used for small volume titrations. This takes a fair amount of practice, though.
-
Serological pipets are a hybrid of the two previous types. Like Mohr pipets, they are straight tubes with graduations. They can be nearly as accurate as volumetric pipets, and they are very convenient. They can be used to dispense various volumes. For example, an experiment may call for dilutions of a stock solution, requiring 2.5, 5.0, and 7.5 mL of solution. A serological pipet is an excellent tool for this sort of work. Most serological pipets are calibrated TD/Blow Out. They have a shaped tip, to hold a cotton plug, and horizontal bands near the top of the tube. They are drained by gravity, and the last drop is gently blown out with a pipet bulb into the receiving vessel.
Before use, a pipet should be rinsed a few times with deionized water. If water droplets remain on the inside, try cleaning the pipet with warm soap solution followed by several rinses of deionized water.
A pipet should be "conditioned" after cleaning. First, obtain a small volume of the solution to be dispensed in a beaker or flask. Never pipet directly from the stock solution bottle! Since you may contaminate this solution, plan on discarding it after conditioning is complete. Draw a small volume of the solution to be dispensed into the pipet, then turn the pipet sideways (parallel to the bench top) and slowly rotate it to coat the inside surface. Then allow the solution to completely drain. The pipet is now ready for transfers of the desired liquid.
Filling a pipet takes a little practice; you may want to try it a few times with deionized water after cleaning it. Use a pipet bulb—never your mouth!—for this purpose. The bulb has a tapered rubber seal. It should never be fitted tightly onto the top of the pipet. Hold the bulb against the top of the tube, just tightly enough to get a seal. Squeeze and hold the bulb in the compressed form, lower the tip of the pipet into the solution of interest, and slowly release the pressure on the bulb. When the liquid has risen slightly above the calibration mark on the neck, quickly remove the bulb and place a finger (typically a thumb or an index finger) firmly on the top of the pipet. A gentle rocking or twisting motion of your finger should allow the solution to drain until the bottom of the meniscus rests at the calibration mark. Remove any droplet hanging on the tip by gently touching the tip to a glass surface, such as a beaker for waste solution.
The contents of the pipet can now be drained into the desired container. Move the tip of the pipet into the container, remove your finger, and allow the liquid to flow out of the pipet. A volumetric pipet will have one remaining drop that should be "touched off" by gently touching the tip of the pipet to an inside edge of the container. A small volume of liquid will remain in the pipet and should be left there. Serological pipets should have all liquid in the pipet expelled—typically with a slight pressure from the rubber bulb.
Graduated pipets (serological or Mohr) are a little trickier to use than volumetric pipets, because there are more options in filling and reading them. Examine such a pipet before you use it and think through what you will do with it. Many graduated pipets have two scales. One scale has the highest values toward the dispensing tip, and is read like a buret. The other has the lowest values near the dispensing tip. This is easier to read when drawing liquid into the pipet for transfer to another vessel.
After using a pipet, rinse it several times with deionized water. Draw up its full volume and allow it to drain. If you use the pipet repeatedly for several aliquots (samples) of the same solution, do not rinse the pipet between uses. You will just have to condition it each time. Clean it when you are finished, or before you start working with a different solution.
Significant Figures and Volumetric Glassware
As the preceding discussion points out, most volumetric glassware is accurate to a few hundredths of a milliliter and is designed so a careful operator can reproduce measurements to this degree of precision. Therefore, measurements made with volumetric glassware are reported to 0.01 mL. Depending on the volumes used, three or four significant figures can be shown in data tables and carried in calculations.