
Techniques
Handling of Liquids, Calibration of Pasteur Pipet
The various common operations that Organic chemists use regularly in the laboratory are called "Techniques." They include extraction, distillation, recrystallization, various forms of chromatography, IR spectroscopy, etc. The major objective of this first semester Organic laboratory course is to demonstrate most of these common techniques and to encourage the student to understand them and to become proficient in their use. These techniques will be used regularly in the second semester and in succeeding Organic laboratory experiences. The student will be expected to know when to apply them and to remember how to perform them. And, they often appear on lab quizzes. Here are some general and very important things to remember. Since you will be handling very small quantities of liquids, special care must be taken to minimize losses. Keep the desktop clean. Work over the glass surface to provide better visibility and to provide a clean and clear surface in case of a spill. Spills can be very deadly. Therefore, work carefully and plan each step. Avoid sudden movements. Support all containers holding liquids by placing them inside another slightly larger container such as a small beaker. This will hold the container erect. Transfers of liquids will also require care. For any quantity of 5 mL or more, the use of a graduated cylinder will be adequate. However, for quantities below 5 mL, too much liquid would be lost on the sides of the graduated cylinder. It is therefore not appropriate.
Small quantities of liquids are never poured.
Calibration of Pasteur Pipets
Very often, you will need to transfer "about 0.5 mL" or "about 1 mL." The easiest way to do this is to use a "calibrated" Pasteur pipet. The calibration procedure is only approximate but very easy:-
•Lay a clean pipet over the following drawing.
-
•Clearly mark the positions of 0.5, 1.0, 1.5, and 2.0 mL on the new pipet with a crayon or other marking pen. Use this same drawing to "calibrate" other pipets throughout the semester as needed.
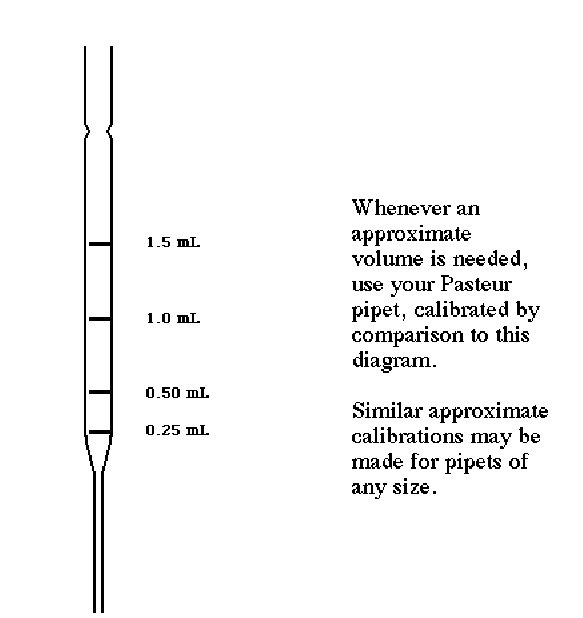
Figure 1: Approximate Calibration of a 5.75'' Pasteur Pipet
Pasteur Filter Pipet
As mentioned earlier, when working with liquids on a small scale (e.g. 0.3-3.0 mL), it is never a good idea to pour. Too much material is lost by just wetting the glass. Furthermore, graduated cylinders are not at all accurate for such volumes. Syringes are excellent, but are expensive and easily broken. The standard "disposable" or "Pasteur" pipet is excellent for transferring small volumes of non-volatile liquids such as aqueous solutions. However, most organic solvents have a significant vapor pressure at room temperature. This causes them to "dribble" from the pipet as a transfer is attempted. To alleviate this source of sample loss, the standard pipet can be easily modified to produce an excellent means of transfer of these small quantities of organic liquids. It also provides an excellent method of filtering small quantities of liquid. We will call the modified pipet a "Pasteur Filter Pipet." All that is required is to place a very small piece of cotton in the tip of the pipet. This technique is sort of an "art" and requires a few trials to get it right. However, once the technique is learned, a new Pasteur Filter Pipet can be prepared in about 30 seconds.Procedure
Take a very small piece of clean cotton — slightly larger than the diameter of the tip of the pipet — and roll it into a ball with your fingertips. Drop it into the larger end of the pipet.
Using about 18'' of Copper wire, push the cotton ball down the narrow end of the pipet until it is just at the end. This will take some practice. Often the wire will bend as you push. This may mean the piece of cotton is too large. If the cotton moves very easily, you probably do not have a large enough piece and it will fall out when you go to use the pipet. Keep trying until you have mastered this very important technique.
When you think you have produced a 'good' filter pipet, attach it to a yellow pipet bulb and draw up some reagent grade acetone. Expel the acetone into a small beaker. Repeat this once or twice to test the pipet and to rinse the cotton. This will also help you to determine if the pipet is 'OK' (i.e., it draws the liquid at a reasonable rate, and the cotton does not move).
Draw air into the pipet to dry the residual acetone.
Make two or three Pasteur Filter Pipets for your drawer and rinse each with acetone and air as above. You will be using these pipets frequently.
Dispose of the acetone washings in the appropriate hazardous waste container in the hood.
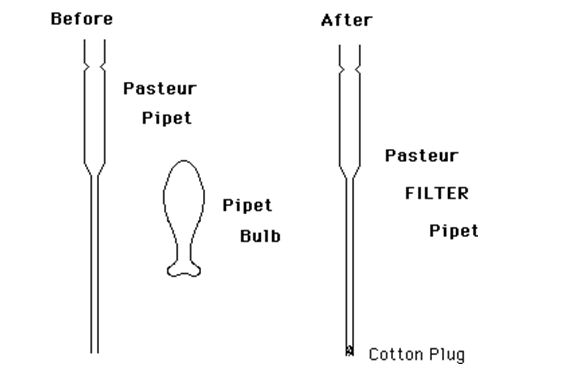
Figure 2: Pasteur Pipet
Heating Reactions
During the course of this semester, there will be many occasions to heat a reaction. In every case, you will use a hot plate/magnetic stirrer to supply the heat. This avoids the use of the flame of a Bunsen burner, which is much more dangerous. Unless specifically directed, the use of a flame is never appropriate in this course. The hot plate heat control needs to be turned slowly. If turned to 'HI' and allowed to remain there it will exceed 400°C in about 15-20 minutes. Also, once set to a high reading, the hot plate will usually keep heating for some time, even after the control has been turned down. This "ballistic" heating is not a wise procedure in this lab. Time will generally be tight, so cooling down a set-up and reheating more carefully to get the desired temperature will waste a lot of precious time, since once the hot plate has been overheated it may take 30-45 minutes for it to cool down. The best rule of thumb is to carefully set the heat and be patient. It may take 10-15 minutes to heat up on a lower setting, but the temperature will not rise ballistically and overshoot the desired temperature. (Remember, the hot plate is very slow to cool down once it has been heated.) Many of the drawings in this book show the use of an aluminum heating block to transfer the heat of the hot plate to the reaction vial. However, the aluminum has a high heat capacity and stays hot long after the reaction. An aluminum block can be easily cooled to room temperature by picking it up with a pair of crucible tongs (NOT your fingers) and placing the block under running cold water for a minute or so. After drying with a towel, it can be reheated or replaced on the side shelf where the blocks are stored. This same cooling procedure should be used for the aluminum collars that are used with the blocks.Caution:
NEVER touch a HOT aluminum block or collar.
NEVER touch a HOT aluminum block or collar.
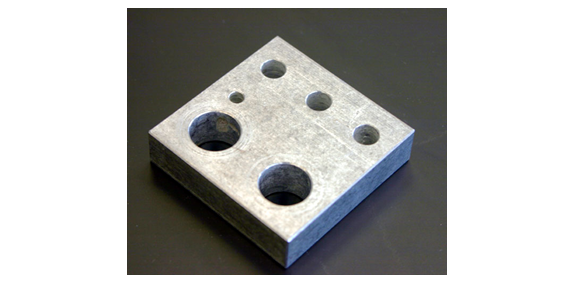
Figure 3: Aluminum Heating Block
Melting Point
Most solids have a characteristic temperature at which they change from the solid to the liquid state. This temperature is known as the "Melting Point" or mp. In fact, this is rarely a very sharp 'point,' but rather is usually a range of about 0.5 to 2 or 3°C. Nevertheless, the name "Melting Point" remains in common use rather than the more accurate "Melting Range." The presence of an impurity in a solid has the effect of depressing the melting point and increasing the temperature range over which the sample changes from solid to liquid, i.e., melts. Conversely, the purer the sample, the sharper the melting point.
Figure 4: Loaded Melting Point Capillary
Patience is a necessity.