Lab 6 - Electrochemical Cells
Purpose
To see how changes in concentration and pH affect the potential in an electrochemical cell, and to confirm the Nernst equation.Goals
-
1To examine how standard reduction potentials are measured.
-
2To relate concentration changes to changes in cell potential.
Introduction
A galvanic cell is an electrochemical cell in which the spontaneous electrochemical reaction proceeds, that is, ΔG for the reaction is negative. The free energy decrease for a galvanic cell is proportional to the cell potential. The greater the driving force of the reaction, the greater the cell potential. The relationship is shown below:( 1 )
ΔG = -nFEcell
-
1Identifying the oxidation (anode) and reduction (cathode) half-cells.
-
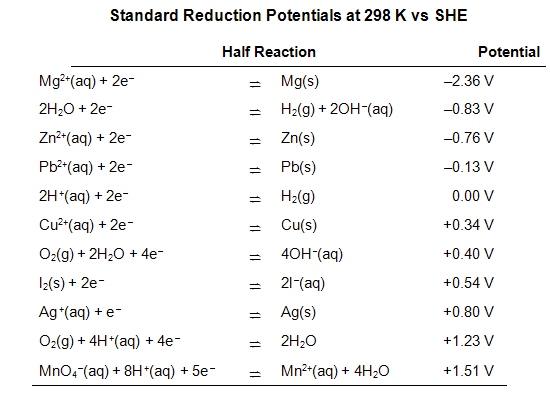
2Looking up the standard half-cell potentials in a table of reduction potentials. An abbreviated table is included at the end of this lab procedure. Reminder: all potentials are listed in the table as reduction potentials.
-
3Substituting the half-cell potentials into the following equation:
( 2 )
E°cell = E°cathode - E°anode
( 3 )
Ecell = E°cell -
ln Q
| RT |
| nF |
2 Ag+(aq) + Mn(s)  2 Ag(s) + Mn2+(aq) 2 Ag(s) + Mn2+(aq) | Q = [Mn2+] / [Ag+]2 |
( 4 )
Ecell = E°cell -
log Q
| 0.0592 |
| n |
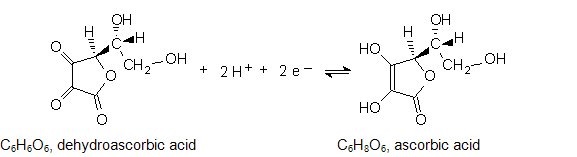 When ascorbic acid acts as a reducing agent, the reverse reaction occurs. Notice that H+ participates in the half-reaction. Therefore, the concentration of H+ (and thus the pH) will affect the reduction potential. The standard potential is defined where [H+] = 1 M, or at pH = 0. Clearly, potentials measured at biologically relevant pH's are not standard potentials.
The dependence of the reduction potential on pH is complicated because ascorbic acid is a weak diprotic acid and is singly or doubly deprotonated depending on pH. Ka for the first dissociation is 5×10⁻⁵. There may be one or two protons in the half reaction, which complicates the exact calculation of the potential shift. Nonetheless, the qualitative dependence of potential on pH can be predicted from the Nernst equation.
It is now worth mentioning a point about measuring potentials with a voltmeter, as you will be doing in this experiment. Most voltmeters are sensitive to the direction in which current flows, and register this as the sign of the potential. In this lab, all the reactions are spontaneous, so all the voltage measurements should have a positive sign. You will be instructed to set up your voltmeter so this is true in the first measurement, then reverse the leads and record the result, then explain what happened. Think about your response to this question now, before the lab.
In this experiment, you will measure the potential difference between a Zn2+/Zn couple and Cu2+/Cu, Pb2+/Pb, and Ag+/Ag couples. You will vary the concentrations of the ions in solution and measure the changes in cell potential that occur. Finally, you will measure the potential of solutions of ascorbic acid versus a Cu2+/Cu couple at different pH's.
When ascorbic acid acts as a reducing agent, the reverse reaction occurs. Notice that H+ participates in the half-reaction. Therefore, the concentration of H+ (and thus the pH) will affect the reduction potential. The standard potential is defined where [H+] = 1 M, or at pH = 0. Clearly, potentials measured at biologically relevant pH's are not standard potentials.
The dependence of the reduction potential on pH is complicated because ascorbic acid is a weak diprotic acid and is singly or doubly deprotonated depending on pH. Ka for the first dissociation is 5×10⁻⁵. There may be one or two protons in the half reaction, which complicates the exact calculation of the potential shift. Nonetheless, the qualitative dependence of potential on pH can be predicted from the Nernst equation.
It is now worth mentioning a point about measuring potentials with a voltmeter, as you will be doing in this experiment. Most voltmeters are sensitive to the direction in which current flows, and register this as the sign of the potential. In this lab, all the reactions are spontaneous, so all the voltage measurements should have a positive sign. You will be instructed to set up your voltmeter so this is true in the first measurement, then reverse the leads and record the result, then explain what happened. Think about your response to this question now, before the lab.
In this experiment, you will measure the potential difference between a Zn2+/Zn couple and Cu2+/Cu, Pb2+/Pb, and Ag+/Ag couples. You will vary the concentrations of the ions in solution and measure the changes in cell potential that occur. Finally, you will measure the potential of solutions of ascorbic acid versus a Cu2+/Cu couple at different pH's.
Equipment
-
1MicroLab Interface
-
1MicroLab Multi-EChem Half Cell module
-
1voltmeter alligator clip leads
-
1pH electrode in pH 7.00 buffer
-
1MicroLab voltmeter/pH instruction sheet
-
1ring stand
-
1clamp
-
1100 mL beaker
-
1deionized water squirt bottle
-
1eye dropper
Reagents
-
~5 mL0.1 M Zn(NO3)2
-
~7 mL0.1 M Cu(NO3)2
-
~5 mL0.1 M AgNO3
-
~5 mL0.1 M Pb(NO3)2
-
~20 mL1 M KNO3
-
~2"zinc wire
-
~2"copper wire
-
~2"silver wire
-
~2"lead wire
-
1graphite rod
-
~3.0 mL1.5 M KOH
- solid Na2HPO4·7 H2O
- solid ascorbic acid
-
~20 drops3.0 M HCl
-
~20 drops3.0 M NaOH
-
~15 mLpH 4.00 buffer
-
~15 mLpH 7.00 buffer
-
~15 mLpH 10.00 buffer
Safety
3 M HCl solution gives off highly irritating vapors. Do not inhale them. Work with concentrated solutions under the hood so vapors do not build up in the lab. If you do inhale enough vapor to have a problem, move to fresh air. Have your lab partner notify your teaching assistant and the lab director about your exposure. HCl, NaOH, and KOH solutions are corrosive. They can attack the skin and cause permanent damage to the eyes. If the solution splashes into your eyes, use the eyewash immediately. Hold your eyes open and flush with water for at least 15 minutes. If contact with skin or clothing occurs, immediately rinse the affected area with water for at least 15 minutes. Have your lab partner notify your teaching assistant and the lab director about the spill and your exposure. Cu2+, Pb2+, and Ag+ ions are listed as toxic when ingested. If contact with skin or clothing occurs, the affected area should immediately be rinsed with water for at least 15 minutes. If Ag+ solutions contact the skin, they will produce brown spots that appear about 24 hours after exposure. They are harmless and will fade in a few days. Students will have access to gloves due to the use of strong acid, strong base, Cu2+, Pb2+, and Ag+ during the lab period.Waste Disposal
The solutions from the experiment should be rinsed into the waste container for redox solutions. There will be a funnel in the container. Pour the contents of the half cell module into the funnel and then rinse the plastic base with water from a squeeze bottle. The metal wires should be returned to the set-up sheet to be used by the next lab section.Prior to Class
Please read the following section of Lab Safety and Practices: Good Lab Practices Please complete WebAssign prelab assignment. Check your WebAssign Account for due dates. Students who do not complete the WebAssign prelab are required to bring and hand in the prelab worksheet.
Lab Procedure
Please print the worksheet for this lab. You will need this sheet to record your data.
-
•Electrodes are kept in standard pH 7 buffer solution when not in use.
-
•Immediately prior to use, the electrodes are rinsed with deionized water and gently blotted with a Kimwipe, then placed in the test solution.
-
•The electrodes are rinsed and blotted again after the measurement and returned to the pH 7 buffer solution.
Part A: Measurement of Initial Cell Potentials
1
Prepare to measure the voltage by following the steps below:
-
a.Plug the cord with the alligator clips into the Microlab 528 unit, matching the black circle with the black lead and red circle with the red lead.
-
b.Double-click on the Microlab 528 icon to activate the software.
-
c.In the new window, select "Experiment Builder".
-
d.Choose"add sensor" and select "Voltage" from the pulldown menu.
-
e.Highlight the region with 2 circles where the alligator clip assembly is plugged into the Microlab unit and use the default range of ± 2.5 volts.
-
f.Select "Use factory calibration" at the bottom.
-
g.The voltage reading will appear in the lower right corner of the display.
2
Fill the center of the cell, shown in Figure 10-1, with fresh KNO3 solution.
3
Fill the wells with the metal ion solutions and place the corresponding metal wire in the solution.
well 1: Zn(NO3)2/Zn. The Zn wire is gray and difficult to bend.
well 3: Cu(NO3)2/Cu. The Cu wire has a characteristic copper color, a shiny brown/tan.
well 5: Pb(NO3)2/Pb. The Pb wire is dull gray and very bendable.
well 7: AgNO3/Ag. The Ag wire will be a shiny gray and look like silver.
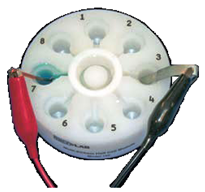
Figure 1: MicroLab Multi-EChem Half Cell Module
4
Attach the black alligator clip lead to the zinc wire. Attach the red alligator clip to the silver wire. Read the voltage. Record the voltage in Data Table A.
Table A: Cell Potentials vs a Zn2+/Zn (0.1 M) Couple
Question 1: In your first measurement, since the Zn2+/Zn (0.1 M) redox couple is the reference, does your test Ag+/Ag (0.1 M) redox couple have a more positive or more negative reduction potential than zinc?
Question 2a: Given your response to the first question, which half-cell is the anode?
Question 2b: What is true about your Zn-Ag cell?
5
Reverse the leads on the metal wires. Measure the voltage and enter it in Data Table A.
Question 3: In your second measurement, how does the voltage differ from the first measurement?
6
Return the black alligator clip to the zinc wire. Next, attach the red alligator clip to the lead wire and measure the voltage. Enter the value in Data Table A.
7
Finally, attach the red alligator clip to the copper wire and measure the voltage. Enter the value in Data Table A.
Part B: Dependence of Cell Potential on [Cu2+]
1
Combine an eyedropper full of 0.1 M Cu2+ solution with about 60 mL of deionized water in a 100 mL beaker.
2
Carefully pour a small portion of the dilute copper ion solution into well 4. Move the copper wire from well 3 to well 4.
Question 4: Write a net chemical equation for the overall reaction in the Zn-Cu cell (spontaneous, left to right).
Question 5a: Predict whether the potential of the cell using the 0.1 M Zn2+ solution and the diluted copper solution will be more positive or less positive than the standard potential you measured in Part A.
Question 5b: What is true about your Zn-diluted Cu cell?
3
Measure the potential of the diluted Cu2+ solution in well 4 versus the Zn2+/Zn couple in well 1 and record in Data Table B.
Table B: Cell Potentials vs a Zn2+/Zn (0.1 M) Couple
Question 6: Did the potential shift in the direction you predicted in the previous question?
4
Add two eyedroppers full of 1.5 M KOH to the diluted Cu2+ solution in the 100 mL beaker, gently swirl the mixture, and observe the reaction.
Question 7: Write a net chemical equation for the reaction that took place when KOH was added.
5
Allow any solid that may have formed to settle to the bottom of the beaker. Then, carefully pour a small portion of the dilute and basic copper ion solution into well 2. Move the copper wire from well 4 to well 2. Measure the potential of the solution in well 2 versus the Zn2+/Zn couple well 1. Record this value in Data Table B.
Question 8: What is true about your Zn-diluted Cu plus KOH cell?
6
Dispose of the remaining diluted Cu2+ solution contained in the 100 mL beaker into the waste container located on the side shelf. Rinse with deionized water from your squirt bottle and add the rinsings to the waste bottle.
Part C: pH Dependence of Cell Potential
1
Prepare 60 mL of a solution that is 0.10 M in ascorbic acid (C6H8O6) and 0.10 M in sodium hydrogen phosphate (Na2HPO4 · 7 H2O). You can weigh both solids into the 100 mL beaker and add 60 mL of deionized water to it afterwards. Gentle swirling should dissolve the solids quickly.
2
Using the pH electrode, adjust the pH of the solution to pH 6.8 - 7.2 by adding 3 M HCl or 3 M NaOH dropwise. It should not take more than 20 drops of either.
3
Carefully pour a small portion of the pH 7 ascorbic acid solution into well 6 of the half-cell module.
4
Place a graphite electrode in well 6. Place the copper wire into well 3.
5
Measure the voltage of the contents of well 6 relative to the Cu2+/Cu half cell in well 3. Make sure it is positive; if not, exchange the leads to the copper and graphite electrodes. Record the voltage and note which lead is connected to copper and which is connected to graphite in Data Table C.
Table C: Cell Potentials for Ascorbic Acid vs a Cu2+/Cu (0.1 M) Couple
What is the color of the lead to copper? What is the color of the lead to graphite?
Question 9: Write a net chemical equation for the overall reaction for this cell (spontaneous, left to right). Use the chemical formulas for dehydroascorbic acid and ascorbic acid, shown in the Introduction above.
6
Use the pH electrode, and adjust the pH of the solution in the 100 mL beaker to pH 4.8 - 5.2. Use 3 M HCl added dropwise. It should not take more than 20 drops. 3 M NaOH is available if too much acid is added.
7
Carefully pour a small portion of the pH 5 ascorbic acid solution into well 8 of the half-cell module. Also move the graphite electrode to well 8.
8
Measure the voltage of the contents of well 8 relative to the Cu2+/Cu half cell in well 3. Record the results in Data Table C.
Question 10: What is true about your Cu-ascorbic acid cell?
9
When you are finished, remove the metal wires and graphite electrodes and rinse them with deionized water, allowing the rinse solution to drain into the 100 mL beaker. Carefully dry the electrodes and return them to their positions on the lab bench.
10
Dispose of the contents of the half-cell module and 100 mL beaker into the waste container in the hood. Rinse these containers with deionized water.
11
Refill the center cell of the half-cell module with KNO3 solution.
12
Please close the MicroLab program and return the pH electrode to the pH 7.00 buffer solution.
13
Before leaving, enter your results in the InLab assignment. If all results are scored as correct, log out. If not all results are correct, try to find the error or consult with your teaching assistant. When all results are correct, note them and log out of WebAssign. The InLab assignment must be completed by the end of the lab period. If additional time is required, please consult with your teaching assistant.