Bunsen Burner
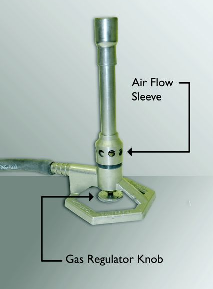
A bunsen burner is one of the primary means of heating in the laboratory. A bunsen burner is designed so that gas and airflow can be regulated separately and manually. Gas is delivered from the lab bench gas valve to the base of the bunsen burner via a rubber tube. Gas flow is regulated with the small knob at the base of the burner and rotating the sleeve at the base of the burner to open or close air inlet holes regulates airflow.
When lighting a bunsen burner, make sure the area around the burner is completely clear and that no flammable solvents are in use in the laboratory. Connect the tubing to the gas valve on the lab bench. Adjust the gas regulator knob on the bottom of the bunsen burner for a moderate flow of gas and rotate the sleeve at the base of the burner so that airflow is almost completely closed off. Strike a match and hold it close to the side of the burner but not quite touching it while you turn on the bench gas valve. If you are using a striker, make sure that the striker is producing sparks, turn on the bench gas valve and then use the striker to produce sparks near the top of the bunsen burner. If the burner fails to light, turn off the gas check the connection to the gas and the gas regulator and correct any problems before attempting to light the burner again. If the burner fails to light upon successive attempts, alert your lab instructor.
The bluer the flame, the hotter it will be. This is achieved by allowing more air into the mixture. Adjust the gas and airflow to produce a flame of the desired size that has two distinct blue regions. The hottest part of the flame is the tip of the inner, dark blue cone. If the burner blows out, turn off the gas at the bench valve immediately. Readjust the gas and airflow to produce a better flame.
To extinguish a bunsen burner, simply turn off the gas at the bench valve.
Notes When Using a Bunsen Burner:
-
•
Never leave a lighted bunsen burner unattended.
-
•
Never point the opening of the vessel being heated (test tube, beaker, etc.) toward you or others near the burner.
-
•
When flammable liquids are being used in the laboratory, a hot plate or a heating mantle must be used in place of a bunsen burner.