
Lab 5 - Characterization of an Unknown Acid
Goal and Overview
The titration curve of an unknown weak acid with a strong base will be measured using a pH meter. From the titration curve, the equivalence point and the pKa of the acid will be found. The melting point of the solid acid will be found using a Meltemp. From the experimental values of molar mass (as derived from the equivalence point), pKa, and melting point, the identity of the unknown acid will be chosen from a list of possible weak acids.Objectives and Science Skills
-
•Perform titrations of an unknown acid solution while recording pH as a function of added base.
-
•Plot experimental titration data and interpret the graphs to determine the approximate pKa and moles of acid in solution.
-
•Use a Meltemp apparatus to determine the approximate melting point of the solid acid.
-
•Evaluate the results for molar mass, pKa, and melting point to determine the probable identify of the unknown acid from a list of choices.
-
•Quantitatively and qualitatively compare experimental results with theoretical values.
-
•Identify and discuss factors or effects that may contribute to deviations between theoretical and experimental results and formulate optimization strategies.
Suggested Review and External Reading
-
•reference section; relevant reference and textbook information on weak acids and bases
Background
A weak acid is one which does not completely dissociate in water solution. Instead, this equilibrium is established:( 1 )
HA(aq) + H2O(l)  A–(aq) + H3O+(aq) or, more simply, HA(aq) A–(aq) + H+(aq)
A–(aq) + H3O+(aq) or, more simply, HA(aq) A–(aq) + H+(aq)( 2 )
Ka =
| [H+][A–] |
| [HA] |
( 3a )
pKa ≡ –log Ka = –log
= –log [H+] − log
= pH − log
| [H+][A–] |
| [HA] |
| [A–] |
| [HA] |
| [A–] |
| [HA] |
( 3b )
pH = pKa + log
| [A–] |
| [HA] |
pH = pKa + log
| [A–] |
| [HA] |
Ka =
| [H+][A–] |
| [HA] |
( 4 )
HA(aq) + OH–(aq) A–(aq) + H2O
A–(aq) + H2O-
ithe dissociation of the weak acid given in Eq. 1HA(aq) + H2O(l) A–(aq) + H3O+(aq) or, more simply, HA(aq) A–(aq) + H+(aq); and,
-
iithe reverse of the self-ionization of water:
( 5a )
OH– + H+ H2O
H2O- with an equilibrium constant of:
( 5b )
1/Kw = 1/([OH–][H+]) = 1/10–14 = 1014
HA(aq) + OH–(aq) A–(aq) + H2O
A–(aq) + H2O( 6 )
Kneut =
=
| Ka |
| Kw |
| [A–] |
| [HA][OH–] |
Titration
As OH– is added to HA, the pH of the solution should change approximately as shown in the example titration curve.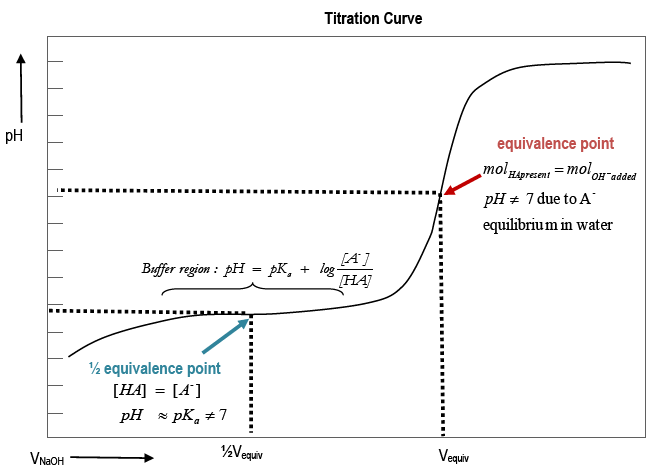
Figure 1: Titration Curve
-
i0 mL added NaOH:
-
pH is that of the original acid solution. The dominant equilibrium isHA(aq) A–(aq) + H+(aq).
- pH is determined primarily by Ka.
-
-
iiBuffer region:
-
pH changes slowly as NaOH is added. [A–] and [HA] are large relative to the amount of OH– added
-
( 8 )
Ka = [H+]
where [A–] and [HA] are large and nearly equal
| [A–] |
| [HA] |
-
- The addition of a strong base consumes a small amount of HA to form some more A–.
- The addition of a strong acid would consume a small amount of A– to form some more HA.
- [A–]/[HA] remains relatively constant so pH shows little change.
-
iii1/2Vequiv :
-
1/2the volume required to neutralize the acid has been added.
-
Approximately 1/2 [HA]initialhas reacted to form A–. [HA] ≈ [A–] andpH ≈ pKa.
-
( 9 )
pH = pKa + log
; at [HA] ≈ [A–], log[1] = 0 and pH ≈ pKa
| [A–] |
| [HA] |
-
ivVequiv:
- pH increases as the equivalence point is neared.
-
At Vequiv, nOH– = nHA = MOH– × VOH–. pH ≠ 7 due to A– + H2O HA + OH– equilibrium.
- The mass in grams of HA titrated divided by the moles of HA present gives the molar mass of HA.
-
vAboveVequiv :
-
Adding more OH–raises the pH. There is a sharp jump in pH above the equivalence volume,Vequiv.
-
Adding more
Melting Point Determination
The melting point of your acid is another one of its distinguishing characteristics. Melting points are tabulated for many substances; in practice, a solid will melt over a small range in temperature. There can be a variety of reasons for this, including impurities or rapid heating. The observed uncertainty in the melting point can be as much as 5 to 10°C. Although melting point data can be somewhat unreliable, it provides further information regarding your acid's identity.Procedure
Caution:
You are working with unknown organic compounds. Handle them with caution and wash them off your skin.
You are working with unknown organic compounds. Handle them with caution and wash them off your skin.
Part 1a: Obtaining the Titration Curve of an Unknown Acid
1
Obtain a vial of unknown weak acid and record its number.
2
Weigh out roughly 0.30 g of the acid and determine its mass to 0.0001 g (analytical balance).
3
Some acids are soluble in water; others are not. On your vial of unknown, there should be either an "a" or a "w".
If your vial has an "a", follow this procedure (dissolve in alcohol):
-
iPut the solid acid into a 250 mL beaker.
-
iiPour 20 mL of alcohol from a graduated cylinder into your beaker.
-
iiiGently swirl for a minute or two to dissolve all the acid in the pure alcohol solution. Beware of alcohol evaporating on the sides of the beaker after the swirling. Do not heat the alcohol because alcohol is flammable.
-
ivAdd about 80 mL of distilled water, washing the sides of the beaker down with the water so that all of the acid sample is titrated. The total volume should be about 100 mL.
If your vial has a "w", follow this procedure (dissolve in water):
-
iDissolve the acid in 100 mL of distilled water.
-
iiYou may have to heat the water to get the acid to dissolve.
Titration:
Follow the procedure outlined for buret usage. Be sure your buret is clean and the stopcocks are firmly seated.Caution:
Do not fill burets on the work-bench. Always keep all chemicals below eye level. This decreases the chance of getting chemicals in your eye in the event of a spill.
Do not fill burets on the work-bench. Always keep all chemicals below eye level. This decreases the chance of getting chemicals in your eye in the event of a spill.
For practice:
-
1Put some water in the buret and practice controlling the stopcock.
-
2If you have air bubbles in the buret, gently knock the bottom of the buret to free them so they can rise to the surface.
-
3You will determine the volume of titrant delivered by subtracting the initial buret reading from the final (volume by difference).
-
4Mount the buret on the stand. In real titrations, you would put a white towel or piece of paper over the dark base of the ring stand so the color change of the indicator will be easy to see. Since this is a practice, your titrant is water. You're just practicing the stopcock control and volume reading. The goal is to get a feel for the buret.
-
5Practice reading the volume (liquid level at the bottom of the meniscus). Take readings to 0.01 or 0.02 mL.
-
6Record the initial volume of water. Add water to a collection flask and read the new volume. Find the volume of water added by difference.
-
7Practice by delivering a milliliter, a few drops, and one drop.
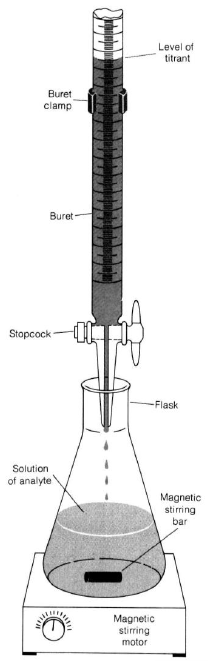
Figure 2
Part 1b: Titrating the weak acid
1
Calibrate the pH meter as instructed. You must set the temperature to room temperature and do a two-point calibration.
2
Set up a 50-mL buret filled with NaOH titrant. Record the molarity of the NaOH to four significant figures.
3
Set the beaker of acid solution on the magnetic stirrer, add the stir bar, and stir slowly. The stir bar should not hit the pH probe.
4
Record the initial solution pH (to two decimal places) and the initial buret reading to 0.05 mL.
5
Titrate the sample with NaOH using the pH meter to follow the titration.
6
Add NaOH in about 1 mL amounts. Record pH and the buret reading with each addition.
7
When there is a larger-than-usual pH change upon the addition of 1 mL base, reduce the volume to 0.5 mL additions.
8
When the pH increases quickly, add the NaOH drop-wise. The region of the big pH jump is where the equivalence point lies. Continue drop-wise additions of NaOH until you have gone beyond the big pH jump by about 1 mL. Then go back to 0.5 mL and eventually to 1 mL additions.
9
Continue adding NaOH until the pH is above 11.
10
Do a second titration.
11
Plot each titration curve (pH of the solution vs. volume of NaOH added). Draw a single, smooth line through the data points. Your curve should look similar to the example given. Discuss your results with your TA before you leave. You may want to repeat part of the experiment.
Select the better titration curve (more closely resembles the example and gives results that are consistent with the acid choices indicated by your TA). Use this curve as the basis for your results. Use average values if you have good titration curves.
12
Record the volume of NaOH at the equivalence point to three significant figures. Calculate the moles of acid originally present in the sample that you titrated. Report this value to three significant figures. At the equivalence point, nOH– = nHA
= (molarity of NaOH)(volume of NaOH added).
13
Divide the mass of your sample (four significant figures) by the calculated number of moles (three significant figures) to find the molar mass of your acid to three significant figures.
14
Read the pH at the 1/2
equivalence volume to two decimal places. This is an approximate value of pKa for your acid.
Part 2: Determining the melting point
1
Obtain two pieces of thin-walled capillary tubing that are sealed at one end.
2
To fill a capillary tube, press its open end into a pulverized sample of the unknown acid. About 1 or 2 mm of powder in the tube is sufficient. You need enough to see the transformation from solid to liquid, but too much will give a large melting point range.
3
Obtain a long piece of glass tubing (the 'bounce tube').
4
To pack the crystals into the bottom of the capillary tube, hold the bounce tube so that it is resting on the work bench. Drop the capillary tube (closed side down) inside the bounce tube. The capillary tube should hit the bench with enough force to pack the crystals but not enough to break the tube. It is also possible to just tap the capillary tube on the lab bench. Your TA can demonstrate.
5
Use the 0 – 260°C thermometer for the melting point. A thermometer should already be in the meltemp device. Use caution with the thermometer (it is bad if it breaks, particularly inside the meltemp).
6
Place one capillary tube in the meltemp as instructed. You should be able to view the solid acid through the window.
Get an approximate melting point range by increasing the temperature fairly slowly. Use your judgment on the rate.
7
When you find an approximate melting point range, place the second capillary tube in the meltemp. Turn the control so that the temperature slowly rises up to the actual melting point. You should record the temperature at which you first see liquid (to the ones place), as well as the temperature at which the sample completely liquefies (to the ones place). You need an accurate melting point range: Tfirst liquid to Tall melted.
Take the average value and report it as am approximate melting point temperature (to the ones place).
8
Each sample can only be melted once. Do not reuse any sample that has been melted.
9
Dispose of the used capillary tubes in the appropriate container in the back fume hood. Do not put capillary tubes in the trash.
-
Follow your TA's instructions. *Nothing should go into the trash*
-
In the back fume hood, there should be:
-
a liquid waste container for the solutions from the titration trials
-
a solid waste container for the remaining weak acid (in its vial) and for the used capillary tubes
-
Part 3: Identifying your acid
With experimental values of molar mass, pKa, and melting point, identify your acid from the list.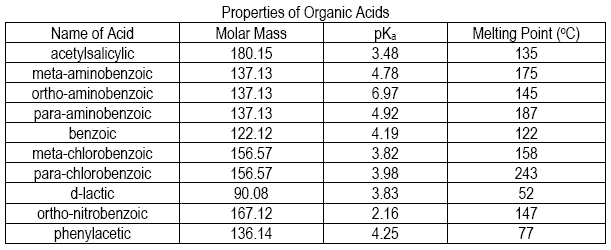
Figure 3
pH = pKa + log
| [A–] |
| [HA] |
Reporting Results
Complete your lab summary or write a report (as instructed).Results
-
MM (unknown acid)
-
pKa
-
Tm.p.
-
name of acid
Sample Calculations:
-
Molar Mass
Discussion
-
What you found out and how for each part
-
What was your unknown acid and why