
Introduction to Electronic Equipment
Introduction
This semester you will be exploring electricity and magnetism. In order to make your time in here more instructive we've designed this laboratory exercise to introduce you to some of the equipment you'll be using in this course. Some of the terms that will be used will be more thoroughly explained in subsequent labs, but will be used here without much explanation to get you started.
You will need to print a copy of this document. Answers will not be submitted electronically. A printer friendly version can be found by clicking the print button in the upper right hand corner of this page.
1
DC (Direct Current) power supply. This is a source of voltage whose polarity does not change, as it does in an AC (Alternating Current) voltage source. Standard electrical outlets supply AC voltage. Using this power supply will be just like using a dry cell battery, except that you will be able to vary the voltage used.
2
Signal Generator. This device generates an AC signal in the form of sine, saw tooth, or square wave. The frequency (the rate at which the signal's polarity changes) as well as the amplitude (which, in this exercise, will be the same as the voltage) can be varied to the user's choosing. This will be a safer and more flexible alternative to using the AC voltage from a wall socket.
3
Digital Multimeter. As the name implies, this device measures (or meters) multiple quantities associated with electrical circuits. A multimeter can be used as a voltmeter (to measure voltage), an ammeter (to measure current, both DC and AC) and an ohmmeter (to measure resistance).
4
Oscilloscope. This piece of equipment looks to be the most confusing of all the equipment you'll be using today. It is, however, essentially just a voltmeter that can show time varying changes in the voltage.
Part 1. Measuring Voltage, Current, and Resistance with a Digital Multimeter
Three different multimeters are provided for this lab: the Fluke 77, the Radio Shack, and the Tenma. The operation of these multimeters is quite similar, so we will focus here on the Fluke 77. The large central knob is used to determine the type of measurement that is made. The types of measurements that can be made are AC voltage (Ṽ), DC voltage(V),
DC voltage below 300 mV (300 mv),
resistance (Ω), AC current (Ã) and DC current (A).
The sensitivity of the meter can be selected by pressing the yellow button on the center of the knob. The meter has a 4
digit display (four full digits plus the first digit that can be either 1 or nothing), so positive or negative values from 0 to 19,999 can be displayed. Pressing the yellow button can shift the decimal point, or you can use the autorange function that automatically sets the decimal point. You should always use the most sensitive scale possible to obtain the maximum number of significant figures.
| 1 |
| 2 |
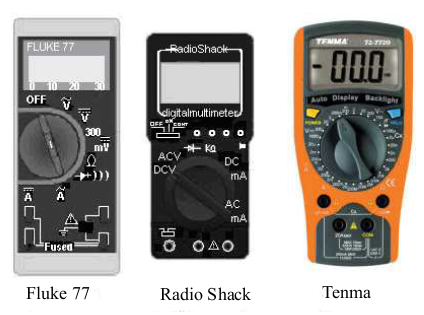
Figure 1
How to Use the DMM
In this segment, we'll be measuring voltage, current, and resistance with a digital multimeter. Voltage is the difference in electrical potential between two points in a circuit measured in units of Volts. Current is the amount of electricity flowing through a circuit segment measured in units of Amperes, or Amps. Resistance is the opposition to current flow measured in units of Ohms.Measuring Voltage
First set up a simple circuit by connecting the small light bulb to the power supply with two banana plug cords. Make sure the power supply is turned all the way down (the control knob should be rotated fully counterclockwise).
Note: the color of the wires is not of critical importance. The color helps identify polarity (red for positive, black for negative) and is used as a standard visual aid.
Caution: DO NOT turn the power supply much past the halfway point—setting the voltage higher than this easily damages the bulbs!
Measuring Current
We will now use the multimeter to measure the current through the circuit. Since measuring the current through a circuit is much different than measuring the voltage across two points in a circuit, we will have to adjust how we put the multimeter into the circuit. The circuit path must be broken and the ammeter connected so that the current is forced to pass through the multimeter. Switch the power supply off without touching the control knob. Remove the multimeter wires from the power supply. On the multimeter, move the wire from the socket marked "V" to the socket marked "300 mA." Now remove one of the wires running to the light bulb and replace it with the multimeter and its wires. Plug one wire from the multimeter into the power supply and the other into the light bulb. Set the multimeter to measure DC Amps and switch the power supply back on. Your meter should now be measuring current flowing through the circuit. In the space provided below, write the current with the correct units and uncertainty. In the space provided on your hard copy of the worksheet, write the voltage with the correct units and uncertainty. Note: The Fluke 77 meters are rated with an accuracy of ±(1.5% of reading + 2 · least significant digit) for currents up to 10 A. The Micronta meters are rated with an accuracy of ±(1.0% of reading + least significant digit) for currents up to 30 mA, ±(1.5% of reading + least significant digit) for currents between 30 mA and 300 mA, and ±(2.0% of reading + least significant digit) for currents between 0.3 A and 10 A. Current through the circuit: What does it mean if you get a negative value for the current?Measuring Resistance
We will use the multimeter for one last measurement of this circuit. We will measure the resistance of the light bulb. Resistance is measured in a similar way to measuring voltage. The meter wires are placed on either side of the circuit element and the resistance is read off of the meter. The difference between a voltage measurement and a resistance measurement is that the multimeter, when put into resistance mode, passes a small current through the circuit element using its own battery. Resistance measurements must be made with the component removed from the circuit. Switch the power supply off again. Remove the light bulb from the circuit completely. Set the multimeter's control knob to the setting marked "Ω" (this is Greek symbol omega, which is the symbol used for ohms). Connect a wire from one side of the bulb to the VΩ socket and another wire from the COM socket to the other side of the bulb. Make sure to record your value on your worksheet with the correct units. Note: The Fluke 77 meters are rated with an accuracy of ±(0.5% of reading + least significant digit) for resistances up to 3.2 MΩ. The Micronta meters are rated with an accuracy of ±(1.0% of reading + least significant digit) for resistances up to 300 kΩ, ±(2.0% of reading + least significant digit) for resistances between 300 kΩ and 3 MΩ, and ±(3.5% of reading + least significant digit) for resistances between 3 MΩ and 30 MΩ. Resistance of the light bulb (power off):Part 2. Measuring Voltage with an Oscilloscope
This part of the lab will be very similar to part 1 in that you'll be measuring voltage from a simple DC circuit. You will be using an oscilloscope in this case, however.A Brief Discussion of Oscilloscopes
An oscilloscope functions very much like a television tube, where a beam of electrons is directed towards the back of the screen by variable electric and magnetic fields. The screen is covered with a phosphor coating that fluoresces when struck by the electrons. A further, more in-depth, discussion can be found in a number of electronic reference materials. The most important controls on the oscilloscope are the gain and sweep settings. The gain setting (measured in volts per division) adjusts the scale of the vertical voltage coordinate. The sweep setting (measured in seconds per division) adjusts the horizontal scale of the horizontal time coordinate. The screen of the oscilloscope looks very much like a Cartesian coordinate system. The coordinate axes are divided into large divisions (about 1 cm in length) and smaller divisions in between the larger ones.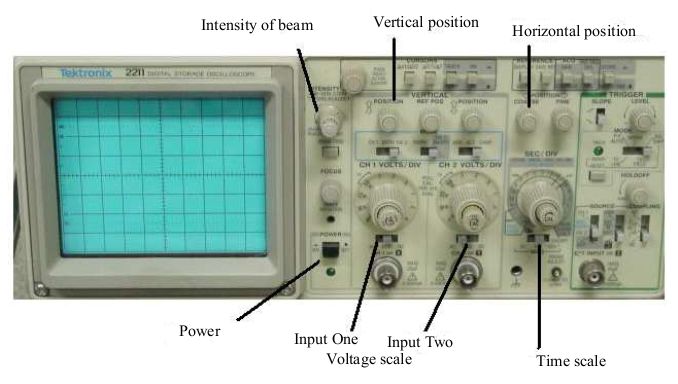
Figure 2
Note: The inner knobs on the gain and sweep settings must be turned fully clockwise to ensure that they are calibrated properly; otherwise your measurements may be inaccurate.
Procedure
DC Voltage
First you will need to power up the oscilloscope and make sure it's set up correctly. You should see a bright green horizontal line across the screen. Adjust the vertical position of the trace line until it lines up with the centerline of the oscilloscope grid. Adjust the intensity and/or focus until you get a thin focused line. You are now ready to measure the voltage of your DC power supply visually. Connect banana plug wires from the power supply to the oscilloscope (remember polarity!). As before, set the voltage at about half the maximum setting. If you do not see the horizontal trace any more, adjust the gain setting until the trace is visible again. On your worksheet, record the gain setting and the displacement of the trace on the screen. Gain setting on scope: Number of divisions: Voltage of power supply: What does it mean if you get a negative value for the voltage?Signal Generator and AC Voltage
Now we will be dealing with an AC signal. This signal will come from a signal generator. These devices might seem just as confusing as an oscilloscope, with just as many knobs and switches; a signal generator does just what its name implies: it generates a signal. You specify the frequency and the waveform (we will be dealing only with sine and square waves) and it generates a signal to your specifications. The most important controls are the range switches, the function switches, and the fine adjust knob. With the range switches, you can adjust between frequencies as low as a fraction of a cycle per second (Hz) to millions of cycles per second (MHz). The function switches select between sine, square, and sawtooth wave patterns. The fine adjust knob tells you where in the range (selected by the range switches) you are. The knob typically has a scale that runs from 0 to 1. So if you had selected the 1 kHz range and set the knob to about 0.75, you would be dealing with a signal whose frequency was about 750 Hz.
NOTE: Always turn the amplitude knob to its maximum value (i.e. all the way clockwise). This will give you the full signal from the generator.