
Electric Fields and Potentials
Introduction
This experiment is intended to illustrate the concepts of electric fields and electric potentials and how they are related to the charge distribution that produces them. When a conducting object is connected to a source of electromotive force (emf) such as a battery or an alternating current power source, an electric field is created, and the free charges in the conductor experience a force that is proportional to the strength of the electric field. In fact, the electric field is defined in terms of the force experienced by a positive test charge:( 1 )
E ≡
| F |
| q |
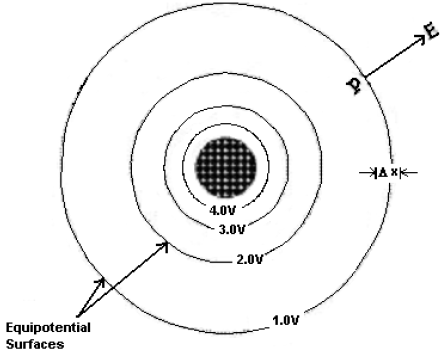
Figure 1
( 2 )
E = lim Δr → 0
 |
| ΔV |
| Δr |
|
Figure 2
Procedure
In this experiment you will determine the equipotential surfaces around several different charge configurations: "parallel lines", a "line and triangle" and "concentric circles". The "parallel lines" configuration consists of a pair of oppositely charged parallel electrodes painted with conductive paint on semi-conductive paper. The "line and triangle" configuration is a vertical line electrode and a triangular electrode pointing towards it. For the "concentric circles" configuration, the electrodes are, as you might expect, a set of concentric rings painted on the paper. A rough picture of the experimental set up is shown in Fig. 3.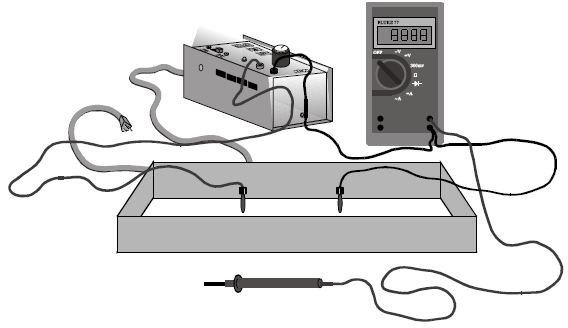
Figure 3
Equipment Set Up
-
1Use banana plug wires to connect the positive and negative leads from the regulated DC power supply to the electrodes drawn on the carbon paper (positive on the right).
-
2Connect a banana plug wire from the negative (common) terminal of the multimeter to the negative terminal of the power supply (black to black).
-
3Connect a wire to the positive (red) terminal of the multimeter. This wire will be used as a probe to measure the voltages at various points in the grid around the electrodes.
-
4Set the multimeter to DC Volts, touch the probe to the positive terminal and adjust the power supply to give 12.0 volts. Touch the probe to each electrode to ensure that the left one is at 0 V and the right one is at 12.0 V.
Parallel Lines Configuration - Qualitative
-
1On the graph paper template for parallel lines, record the voltage on each electrode.
DO NOT WRITE ON THE BLACK CONDUCTIVE PAPER!
-
2Use the voltage probe to locate 5 equipotential lines between and around the two electrodes. The simplest way to do this is to find a point on the conductive paper that is at a certain potential (e.g. 2.0 volts), and use the probe to locate the path of this particular equipotential line as it encircles one of the electrodes (Note: some equipotential lines extend beyond the graph paper boundary). Repeat this procedure to locate the equipotential lines at 2.0, 4.0, 6.0, 8.0, and 10.0 volts. Do not spend too much time taking lots of data points for one line; concentrate more on the general shape of the lines.
-
3As you take data, mark the corresponding points on the graph paper and connect the equal voltage points with a smooth curve. Clearly label the voltage associated with each equipotential line. You should work with a lab partner to take data, but STUDENTS MUST RECORD THEIR OWN MEASUREMENTS AND DRAW THEIR OWN GRAPHS FOR THEIR LAB REPORT.
-
4After drawing all 5 equipotential lines on your graph paper, sketch about a dozen electric field lines as they extend throughout the entire rectangular region (not just between the electrodes). Be sure to include arrows on the field lines to indicate the proper direction of the electric field. Note: the equipotential lines should not have arrows on them. Why?
Parallel Lines Configuration - Quantitative
-
1Make a data table with columns for distance, x (0 to 28 cm), and voltage, V.
-
2Beginning on the left side of the tray (0-cm mark), measure and record in your data table the electric potential at each 1-cm grid along the horizontal line that passes through the middle of both electrodes to the right side of the tray (28-cm mark).
Line and Triangle - Data
A printable template of the line and triangle configuration can be found here.-
1Connect the positive terminal of the power supply to the triangle and the negative side to the line. Repeat the procedure in the section "Parallel Lines" Configuration - Data to locate 5 equipotential lines around the electrodes. Use these to find the electric field between and around these electrodes.
-
2Can you tell from the density of the field lines where the magnitude of the electric field is greatest? How does this configuration relate to the use of lightning rods? (The lightning rod was invented by Benjamin Franklin over 200 years ago, but these devices are still used today to protect buildings from lightning strikes.)
Concentric Circles Configuration - Data
A printable template of the concentric circles configuration can be found here.-
1Consider a radial coordinate system, with the origin, r = 0, at the center of two concentric circles. Make the inner ring the 12-V electrode and the outer electrode V = 0. In a data table, measure and record the electric potential for V(r) for r = 0 to 14 cm.
-
2Measure and record the electric potential at several other points inside the small ring and outside the large ring. Qualitatively, what should the potentials be in these regions? Are they as you expected? Explain why or why not.
-
3Locate the 4V and 8V equipotential lines between the two rings using the same procedure outlined for the "parallel lines" configuration.
-
4Now draw in your electric field lines as you did in the previous procedures.
Write out and sign the honor pledge as listed in the introduction of this manual. In future
reports you may simply write "Laboratory Honor Pledge", but for this first report, write out the
entire pledge.
Data Analysis
Parallel Lines Configuration - Analysis
You will now graphically analyze the quantitative data that you obtained in the section Parallel Lines Configuration - Quantitative. Before you begin, look at the electric fields and potentials you sketched in the section "Parallel Lines" Configuration - Data and predict (via small sketched graphs) what V(x) and E(x) should look like. Now carefully plot (by hand) a graph of V vs. x using the data from the table you generated in the section Parallel Lines Configuration - Quantitative. Follow proper graphing techniques for constructing and labeling your graph (see Graphing Techniques for more information). For the data points between the lines, draw a best-fit line. Find its slope and report the result in V/m. For the data points outside the electrodes, draw smooth curves through the data. Below your graph of V(x), sketch and label a corresponding graph of E(x) for this same region. Remember that E(x) is the gradient of V(x). What do these graphs tell you about the electric field between and outside the parallel lines?Concentric Circles Configuration - Analysis
Make a rough plot of V vs. r. Is the shape of the curve as expected in each of the three regions: inside the small ring, between the rings, and outside the large ring? Where is the electric field strongest and weakest? Use this configuration to explain why coaxial cables are used to shield a signal from electromagnetic interference.Discussion
Now that you have sketched predictions and graphed your data, summarize your findings. Were your predictions correct? Did the equipotential lines you found fit the shape you expected? How about the electric field lines that you drew from the equipotentials? Did they look as you thought they should? Discuss qualitatively your conclusions, based on your results, for each type of configuration.-
•The parallel lines configuration is similar to a parallel-plate capacitor and gel electrophoresis for DNA analysis. What advice can you offer to people who wish to use this arrangement to produce a uniform electric field?
-
•Examine the electric field around the triangle electrode configuration and use this to explain how a lightning rod works.
-
•Examine the electric field for the concentric circle configuration and use this to explain why coaxial cables "shield" interference.