
Radioactivity
Introduction
The most common form of radiation is the electromagnetic wave. These waves include low energy radio waves, microwaves, visible light, x-rays, and high-energy gamma rays. Electromagnetic waves appear to be made up of oscillating electric and magnetic fields. Other forms of radiation include the tiny alpha particles and beta particles that are ejected from the nuclei of certain elements that are known as radioactive if they spontaneously emit radiation.Natural Radiation in the "Background"
Radiation passes through our bodies all the time. It comes from cosmic rays and from radioactive atomic nuclei that exist naturally in the materials in our surroundings and in our own bodies. Radioactive radon gas is in the air we breathe. In addition to naturally occurring radiation, we are exposed to man-made sources of radiation including fallout from the testing of nuclear weapons, releases from nuclear power plants, and radioactive materials in tobacco smoke. There are three natural sources of radiation that we are constantly exposed to: gamma rays and beta particles from radioactive minerals in the ground, the radioactivity in our own bodies, and atmospheric cosmic rays from outer space.1
Radioactive Minerals: Radioactive elements were part of the original composition of the earth. These elements and the daughter elements, which formed as a result of their decay, emit ionizing gamma and beta radiation that cause most of the exposure of humans to natural radiation. The key primary sources of natural radioactivity are potassium, thorium, and uranium.
2
Radioactive Materials in the Human Body: The radioactive elements found in the human body come mostly from the ingestion of food, drinking water, and tobacco smoke containing them. Potassium and radium and its decay products are the most common radioactive elements that are ingested. Some additional elements come from the inhalation of radon, an airborne noble gas, and its daughter products that become attached to dust particles. The alpha particles emitted by internal sources of radiation are the source of most of the exposure to ionizing radiation from materials in the body.
3
Cosmic Rays: About 2 × 10¹⁸ primary cosmic ray particles consisting mostly of protons having energies of more than a billion electron volts are incident on the earth's atmosphere each second. Most of the primary cosmic rays interact with atoms in the atmosphere and produce hundreds of secondary radiation particles such as muons, electrons, and gamma rays. Sometimes these secondary particles of radiation arrive in bursts.
Radioactive Decay
Certain isotopes of some elements are unstable and decay by spitting out energetic particles. These isotopes are said to be radioactive. When this decay occurs some of the neutrons or protons rearrange themselves or are transformed in some way. The three most common particles given off in the decay process are known as the alpha particle, the beta particle, and the gamma ray respectively. The alpha particle is not really a single particle, but rather, it consists of a collection of two neutrons and two protons. Indeed it is the nucleus of the element helium that ordinarily contains two neutrons and two protons. Thus, it has two fundamental units of charge.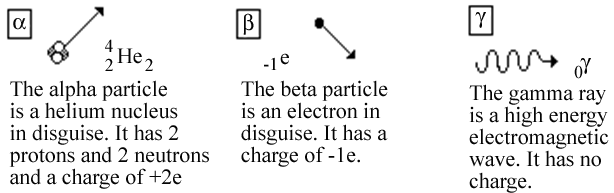
Figure 1: The three most common types of particles given off in radioactive decay.
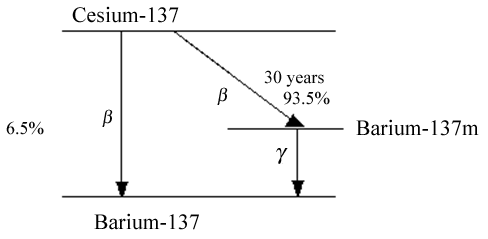
Figure 2
Detecting Ionizing Radiation with a Geiger Tube
Alpha, beta, and gamma particles can ionize other atoms in their paths. This fact allows us to detect their passage electronically with a device called a Geiger tube. In a Geiger tube, an ionizing particle is passed into a cylinder of gas that has a high voltage between a central electrode and the outside. When electrons are knocked off of atoms the electrons flow toward the central electrode while the positive ions flow toward the outer wall of the cylinder. This creates a burst of current that can be amplified and sent to a computer or electronic counter (such as the Nucleus counter unit that you will use) so the passage of a particle of ionizing radiation can be recorded.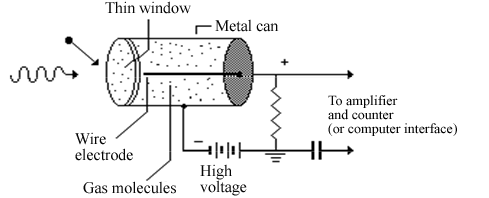
Figure 3
Part 1: Radioactivity and the Inverse Square Law
Object
To study the dependence of gamma-ray intensity on distance from a point source.Caution:
The Nucleus scaler supplies high voltage to the Geiger tube. Do not tamper with or remove the Geiger tube.
The Nucleus scaler supplies high voltage to the Geiger tube. Do not tamper with or remove the Geiger tube.
Introduction
The intensity of radiation decreases with distance from a source because the radiation diverges from the source and because the medium may absorb some of the radiation. The decrease due to divergence can be understood if one thinks of light radiating from a lamp. Suppose a plain sheet of paper is held first at a distance of ten feet from a lamp, and then is moved back to a distance of twenty feet. At twenty feet the intensity of illumination on the paper will be found to be only one-fourth as intense as it was at ten feet because the same light is now distributed over a total area four times as large. Whenever the intensity of radiation varies inversely with the square of the distance, we say it obeys the Inverse Square Law. The intensity of radiation will vary inversely as the square of the distance provided that the radiation is emitted by a point source and that the material in the path absorbs no radiation. The purpose of this experiment is to observe the extent to which this law is obeyed for radiation emitted by a small radioactive source. A departure from the inverse square law may be explained by absorption of some of the radiation by matter in the path or by the fact that the emitting source is not a point source. You will be furnished with a specimen of radioactive cesium (137Cs) mounted in a small lead box. It is important that the apparatus be arranged in such a way that radiation from one set-up will not affect a neighbor's experiment. Where two source boxes are being used on the same lab table, the two boxes must be "pointing" in different directions. In this way you can be assured that you are detecting radiation only from your own source. When background readings are being taken, be sure that all sources are behind a lead shield, and at a safe distance from the Geiger tube.Caution:
These ARE NOT TRIVIAL SOURCES OF RADIATION! Keep the doors of the sources closed when not taking readings and do not look into the mirrored cover of the source!
These ARE NOT TRIVIAL SOURCES OF RADIATION! Keep the doors of the sources closed when not taking readings and do not look into the mirrored cover of the source!
Radiation Exposure — Follow these rules to minimize your exposure during radiation experiments:
-
1Use the smallest amount of radioactive material as possible.
-
2Use appropriate shielding to block radiation to your body.
-
3Stay as far away as possible from the radioactive source. (Inverse square law)
-
4Keep your exposure time to a minimum.
Procedure
1
Before the Geiger tube and counter can be used to collect data, the voltage on the tube must be adjusted to the correct value. First set the HIGH VOLTAGE COARSE and HIGH VOLTAGE FINE controls to zero. Depress the counter POWER button to turn the instrument on; set the COUNT INTERVAL control to MANual. Place the Geiger tube near an unshielded radioactive source and depress the COUNT button. Set the HIGH VOLTAGE COARSE switch to 200 volts and slowly advance the HIGH VOLTAGE FINE control while observing the counter display. When counts first begin to appear on the display, note the voltage setting of the FINE control; set the FINE control 75 volts higher than this value. The instrument is now ready for use.
2
You should now obtain the count-rate due to background radiation from natural radioactive sources, such as cosmic radiation. Make sure your sources and all other apparatus that might contain radioactive material (luminous dial watches, for example) are shielded or placed well away from the Geiger tube. Set the COUNT INTERVAL control to 1 minute, briefly press RESET to clear the display, and then press COUNT to start the counter. The timer will automatically stop counting after one minute has elapsed. Record the reading on the display: this is the number of counts for 1 minute. Measure the background radiation for another two one-minute intervals, then calculate the average background count per minute. The uncertainty in this (and other count measurements) can be estimated by the square root of the number of counts.
( 1 )
uN =
 | N |
The theoretical basis for this calculation is based on the Poisson distribution (see statistical references on this subject for more information).
3
The distance between the detector and the source should be measured from the thin window of the detector. (Caution: The detector window is very fragile. Do not touch it!) Make two one-minute observations of the count rate with the source 0.l0 m, 0.l5 m, 0.20 m, 0.25 m and 0.30 m from the detector. Record your results in a data table with columns for the following.
-
•distance r from source to detector
-
•observed counts/minute
-
•net counts/minute (Note: The net count rate equals the observed count rate minus the background count rate.)
-
•distance r from source to detector
-
•observed counts/minute
-
•net counts/minute (Note: The net count rate equals the observed count rate minus the background count rate.)
Analysis
The equation for the count rate is given by( 2 )
N = Arn
( 3 )
ln(N) = n ln(r) + ln(A)
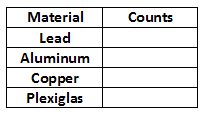
Part 2: Radioactivity and Shielding
The aim of this experiment is to measure the effect that shielding has on the gamma-ray intensity of the cesium source. You will look at both the effect that different types of materials have on shielding plus the effect of increasing the thickness of your shield. The shields will be made from four common materials: Plexiglas, aluminum, copper, and lead. The effect of shielding is also called attenuation. If a parallel beam of radiation passes through a uniform material such that if once scattered it will not appear again in the beam, then the intensityIx
of the beam after it has gone a distance x into the material is given by an exponential-attenuation relation.
( 4 )
Ix = I0e−μx
Procedure
Part A
Here you will examine the shielding effect from different materials.1
Set your detector 10 cm from the source and make sure your counter is ready using the instructions from earlier in the lab.
2
Place one sheet of lead in the slots toward the front of the Geiger counter tube and collect the number of counts over two one-minute intervals.
3
Repeat step 3 for each of the remaining materials: Al, Cu, and Plexiglas.
Part B
Here you will see the relationship between the intensity of your radiation source and the thickness of your shield.1
Set the detector 10 cm from the source.
2
Place six of the transparency squares in the holder and take a reading over 60 seconds.
3
Remove one sheet and repeat step 2 until you have no sheets left.
4
Determine the thickness of one shield. (What is the best way to find this?)
Analysis
Part A
Which materials blocked the most radiation? Remember to account for statistical variations as well as differences in thickness. In your lab report list the materials in order of most absorbent to least. What do you think makes one material a better shield than the other? Compare the number of counts you detected with no shielding to the number of counts with just one shield. Using the information about your radiation source at the beginning of the lab, what reasons can you come up with for such a decrease in counts?Part B
The equation used to measure the attenuation of radiation passing through a material is given by equation 4Ix = I0e−μx
, where Ix
is the intensity after x distance into the material, I0
is the initial intensity, μ is the linear attenuation coefficient, and x is the penetration depth (or thickness of the material). This equation can be rewritten as
( 5 )
Nx = N0e−μx
Nx
vs. x and see if your graph fits to an exponential curve. If you take the natural log of both sides you can rewrite the equation as the following.
( 6 )
ln(Nx) = ln(N0) − μx
ln(Nx)
vs. x, the data should be in a straight line allowing a linear fit. Use your graph to determine the value of μ.
Part 3: Half-Life of Barium-137m
Overview
The half-life of Barium-137m is measured by observing the number of γ-rays emitted from this nucleus over a period of time. The emitted particles are recorded as counts detected by a Geiger-Muller tube.Theory
Studies of radioactive decay have shown that the rate of disintegration of a given isotope is proportional only to the number of atoms of the isotope present at any given time. That is,( 7 )
| ΔN |
| Δt |
( 8 )
N = N0e−λt
t = 0
and t is the elapsed time. The activity (A) at this time is then
( 9 )
A = λN = λN0e−λt = A0e−λt
( 10 )
| N0 |
| 2 |
( 11 )
t1/2 =
=
| ln 2 |
| λ |
| 0.693 |
| λ |
Data
The following data was collected at 30-second intervals for 10 minutes while maintaining a fixed distance between the Geiger tube and a sample of Ba-137m.
Counts for 30-s intervals: 217, 162, 143, 134, 127, 129, 103, 95, 82, 77, 83, 71, 69, 61, 57, 48, 56, 60, 50, 51.
Analysis
Use Excel to find the half-life of the radioactive isotope. (Remember to correct for background radiation by first subtracting the asymptotic limit of the counts/interval as time →∞.)
Compare your result with the accepted half-life value of 2.6 minutes for Ba 137m.