
Chemical Reactions: The Copper Cycle
Organization
-
•Mode: pairs assigned by instructor
-
•Grading: lab notes, lab performance and post-lab report
-
•Safety: Goggles, closed-toe shoes, lab coat, long pants/skirts and sleeves; latex or nitrile gloves recommended, use care with acids.
Goal:
To convert elemental copper into different copper compounds by a series of chemical reactions, regenerating elemental copper at the end of the copper cycle.
To convert elemental copper into different copper compounds by a series of chemical reactions, regenerating elemental copper at the end of the copper cycle.
| CHEM 115 Expt. 9 | Chemical Classification | Possibility Of: | NFPA Codes | |||||||||||||||||||
|---|---|---|---|---|---|---|---|---|---|---|---|---|---|---|---|---|---|---|---|---|---|---|
| The Copper Cycle |
Poison A
|
Flammable Gas
|
Flammable Liquid
|
Combustable Liquid
|
Reacts with Water
|
Oxidizer
|
Organic Peroxide
|
Poison B
|
Corrosive Acid
|
Corrosive Base
|
Irritating or Harmful
|
Misc. Hazard
|
No Hazard
|
Fire
|
Sudden Release of Pressure
|
Reactive
|
Immediate (Acute) Health Hazard
|
Delayed (Chronic) Health Hazard
|
Fire
|
Health
|
Reactivity
|
Special Precautions
|
| Copper Metal | X | 0 | 2 | 0 | ||||||||||||||||||
| Hydrochloric Acid, 6 M | X | X | 0 | 2 | 0 | COR | ||||||||||||||||
| Magnesium, Metal | 1 | 1 | 1 | W | ||||||||||||||||||
| Nitric Acid, 6 M | X | X | X | 0 | 3 | 0 | COR | |||||||||||||||
| Sodium Phosphate, 0.5 M | X | 0 | 2 | 0 | ||||||||||||||||||
I: Background
Part A: Overview of Task
Good laboratory technique is necessary for the successful cycling of copper through a sequence of reactions. Be careful in the transfer of solutions and solids from one container to the next, and try to make those transfers as complete as possible. Make sure that you completely precipitate insoluble products before filtering the reaction mixture. Be aware of good filtration technique. The amount of elemental copper that you obtain from the last reaction will be a measure of the quality of your laboratory technique.
Do not start the first reaction until you have read through all of the background sections.
Part C provides guidelines on getting the first reaction started.
Caution:
The reaction of nitric acid and copper must be done in the back of a fume hood. The noxious and toxic NO2 gas produced during the reaction must not be allowed to escape into the lab air. Do not under any circumstances add nitric acid to the copper metal unless your beaker is in a fume hood. Additionally, the beaker must remain in a fume hood until the reaction is complete. Consult your instructor before removing the beaker from the fume hood.
The reaction of nitric acid and copper must be done in the back of a fume hood. The noxious and toxic NO2 gas produced during the reaction must not be allowed to escape into the lab air. Do not under any circumstances add nitric acid to the copper metal unless your beaker is in a fume hood. Additionally, the beaker must remain in a fume hood until the reaction is complete. Consult your instructor before removing the beaker from the fume hood.
Part B: General Guidelines of Good Laboratory Technique
1
Make sure glassware is clean and reasonably dry before beginning. Use a small enough beaker to contain the volume of solution, but not so small that the beaker would be close to full given the necessary volumes, or so large that the depth of the solution is very shallow.
2
It is a good practice to take an aliquot of a reagent to your bench in a beaker. Take a little more reagent than you think you'll need in case of spills and in case you need a little extra for your reaction. The amount of reagent needed for your experiment can be measured more accurately with a graduated cylinder or a pipet, and is taken from this aliquot at your bench, rather than directly from the stock bottle. This helps ensure that the stock solution used by everyone won't get contaminated, and that there won't be a long wait at the stock bottle as people are carefully measuring out the reagent.
3
Label your containers of liquid and solid reagents. Lots and lots of reagents are clear liquids, and very many chemicals form white solids, which makes it difficult to distinguish between them in the absence of a label. If you don't know what's in a beaker, dispose of it as hazardous waste and start again.
4
Add reagent to your experiment slowly and carefully, using a pipet to add the reagent dropwise. Stir or swirl the reaction mixture and carefully observe the reaction.
Goal:
To completely react the copper-containing reactant in each step.
To completely react the copper-containing reactant in each step.
There are different ways to ensure this, depending on the physical state of the copper salt.
-
•Dissolving a Solid to Obtain a Soluble Copper Product If the reaction starts with a solid copper compound and produces a soluble copper product, then you want to completely react the solid copper reactant. A good clue that the solid has completely reacted is the disappearance of that solid. You can stop adding reagent once the solid is gone, even if you haven't added the calculated amount. If the solid hasn't disappeared after you've added the amount of reagent calculated, however, try the following in this order.
-
a.Use a glass stir rod and stir the contents of the beaker. This increases surface area and mixes the solution so that the reaction can take place.
-
b.Gently heat the reaction—do not boil. To gently heat a reaction, use a hot plate set between 40°C and 60°C.
-
c.Add more reagent in small aliquots (a few drops at a time) and swirl or stir the mixture until the solid disappears. If you do this, be sure to record the amount of additional reagent added.
-
d.Carefully pour the solution with the dissolved copper salt into a clean beaker or flask. (Warning—you want to keep the solution, so don't let it get contaminated.) Add a little more reagent in small aliquots to the remaining solid in a beaker until it dissolves. Combine the solutions and continue.
-
Please Note:
You want to add just enough reagent to dissolve all of the solid. While the addition of excess reagent will certainly dissolve the solid, that excess reagent may interfere with the next reaction in the cycle and probably require you to add more of the reagent for each following step than you calculated.
You want to add just enough reagent to dissolve all of the solid. While the addition of excess reagent will certainly dissolve the solid, that excess reagent may interfere with the next reaction in the cycle and probably require you to add more of the reagent for each following step than you calculated.
-
•Precipitating a Solid Copper Product Formed From a Soluble Reactant If the reaction starts with a soluble copper compound and produces a solid copper compound, then you want to add reagent until no more solid forms. This is a little bit harder to see in the beaker. Placing a white sheet of paper behind the beaker and performing the reaction in a beaker that is about half-full may help with visibility. In this circumstance, it is good practice to continue adding reagent until no further precipitation is seen, collect the solid, and then test the solution that remains (called the supernatant or filtrate) for more precipitation by adding small amounts of more reagent to it. There are two ways to collect the supernatant or filtrate—decantation or filtration—depending on the physical appearance of the solid-liquid mixture. Make sure you collect the supernatant or filtrate into a clean beaker or flask. You are going to test this filtrate, so you don't want it to be contaminated.
- Filtration Set up a clean Büchner funnel with filter paper and a clean filter flask connected to a trap and vacuum source as shown in the picture.
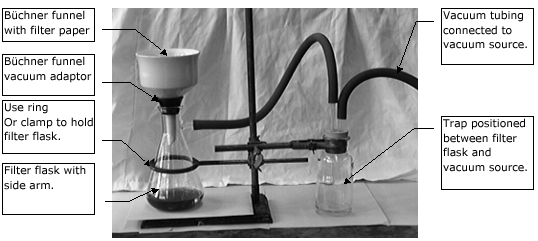
Figure 1
-
-
i.Wet the filter paper using a minimal amount of water with the vacuum on, and slowly add the contents of your reaction beaker to the center of the funnel. If solid remains in the beaker, leave it for now until after you have tested the filtrate. Turn off the vacuum, and pour the solution from the filter flask (the filtrate) into a clean beaker. Leave the solids collected in the funnel for now. Do not worry about washing it until after the filtrate has been tested.
-
ii.Test the filtrate for precipitation by adding small amounts of reagent. If precipitation is seen, continue adding reagent until no more precipitate forms. Collect the solids as before in the Büchner funnel. (You may use the same funnel with the solids already collected, or get a new funnel and clean filter paper. Remember to turn the vacuum on before adding anything to the funnel.) Test the new filtrate. Repeat until no more solids form in the filtrate.
-
iii.Once the reaction is complete and no more solids are obtained, combine the solids into one Büchner funnel to wash them. It is good practice to have the vacuum on while adding anything into a funnel, so that nothing gets beneath the filter paper. If you are adding solid from a filter paper, you can rinse the filter paper with a generous amount of water in order to get all of the solid, or scrape the solid carefully off of the filter paper. Rinse any solids from beakers into the funnel with a generous amount of water.
-
iv.Washing the Collected Solid Once all of the solids have been collected, turn off the vacuum. Slowly—being careful not to disturb the filter paper—add enough distilled water to the funnel to cover the solids. Use a glass stir rod (not a spatula) to gently stir the solids around, all the while being careful not to tear the filter paper. Turn the vacuum on to remove the washing liquid. Repeat the washing a second time. If you are nervous about doing this in the funnel, you may wash all of the solids out of the funnel and into a beaker, add distilled water, stir, and filter the solids onto a new piece of filter paper.
-
Caution:
All of the supernatant, filtrate, and washes should be disposed of in a hazardous waste container.
All of the supernatant, filtrate, and washes should be disposed of in a hazardous waste container.
Part C: Specific Guidelines for Each Step of the Cu Cycle
When the product is a solid, it is good practice to collect that solid and wash it with water in order to remove unreacted reagents and unwanted products.
| Reaction | Specific Guidelines for Reaction |
|---|---|
| Cu(s) + HNO3(aq) → |
This reaction must be performed in the back of a fume hood. You should add HNO3 in small aliquots to avoid boil-over and loss of Cu. This reaction should initially occur rapidly and vigorously, with instantaneous generation of noxious fumes and bubbling, resulting in a solution that turns a dark blue-green. The reaction slows down as it goes, due to the loss of reactant and may take close to 30 minutes to go to completion. Towards the end, it can be helped along by gentle heating, addition of excess HNO3, or decanting the solution into a clean beaker and adding HNO3 directly to the undissolved copper. If you decant, remember to keep the solution you are making, and be sure you use clean glassware.
If the reaction does not start as described, it is possible that the nitric acid is not 6 M. Consult with your instructor, discard your solution as hazardous waste, and then obtain a new bottle of 6 M HNO3. |
| CuCl2 + Mg → | This reaction should occur vigorously, and you should immediately see product formation. If it does not occur, inform your instructor. Mg reacts with HCl as well as with CuCl2, so you will probably need to add a little extra Mg as the reaction slows down (the solution becomes paler over time) in order to ensure you maximize the yield of copper. If you added a lot of extra HCl in the previous step, you will need to add a lot of extra Mg now. Use a glass stir rod to knock Cu off of the magnesium turnings to maintain the rate of the reaction. If it appears that all of the magnesium has reacted, but the solution is still colored (from dissolved Cu2+), add more Mg. When the reaction slows down, knock the Cu off of any Mg turnings, and add a few extra drops of HCl. Once the solution has become clear, add extra HCl to make sure all of the magnesium will dissolve. When all the Mg has dissolved, no more bubbles will be seen. |
| Cu(NO3)2 + Na3PO4 → | Add a small amount of Na3PO4 dropwise with gentle stirring or swirling until solids form and stay. Then add the stoichiometric amount of Na3PO4 to form product in small aliquots with gentle swirling or stirring. The addition of extra Na3PO4 will cause no specific problem for this reaction, but it may interfere with the next reaction, if you do not collect and wash the solids completely. Collect the solids, and test the filtrate as described in the General Guidelines. Wash the solids. |
| Cu3(PO4)2 + HCl → | There are no specific guidelines. |
| Collecting Solid Cu at The End of Cycle | Use the Büchner funnel to collect the solid Cu. Make sure any large pieces do not contain unreacted Mg by breaking them up with the end of a stir rod. Wash the copper two or three times with water. Allow the sample to completely air-dry before weighing. |
II: Experimental
-
•the reaction you are carrying out
-
•the calculated amount of reagent needed
-
•the amount of reagent actually added (do not record the "calculated amount")
-
•your observations of the reaction (color, precipitation, dissolution, etc.)
-
•a description of any manipulation (adding excess reagent, filtration, transfer of solutions, washing solids, etc.)
-
•any problems that occur along the way
Make sure your goggles are on your eyes, and the goggles of your neighbors are on their eyes.
1
Use the top-load balance and weigh boat to weigh out approximately 0.6 g Cu. Record the actual mass obtained. (Recall in discussion that you performed your calculations based on 0.636 g Cu, but do not waste time getting exactly 0.636 g Cu.)
2
Calculate the volume of 6 M HNO3 needed to react with your measured Cu. Use a 10.0 mL graduated cylinder to measure the volume of 6 M HNO3. Place the solution in a labeled 50 mL beaker in a fume hood.
| Glassware | Error | Error for a 50 mL Nominal Volume Measurement |
|---|---|---|
| 50 mL Beaker | 5 mL | Volume will be Between 45 and 55 mL. |
| 50.0 mL Graduated Cylinder | 0.5 mL | Volume will be between 49.5 and 50.5 mL. |
| 50.00 mL Volumetric Flask | 0.05 mL | Volume will be between 49.95 and 50.05 mL. |
3
Put a 50 mL beaker containing your Cu into the back of a fume hood.
4
Add the calculated amount of 6 M HNO3 in small aliquots (i.e. dropwise using a disposable plastic pipette). Caution: This reaction is initially vigorous. To avoid boil over and loss of Cu, add HNO3 in small aliquots and wait for the reaction to subside before adding more HNO3. The brown gas evolving is NO2, which is toxic, so leave the beaker in the fume hood until the reaction is complete. Record all observations in your lab notebook. It may take about 30 minutes for the Cu to dissolve; however, the reaction slows down significantly as it goes, so you might need to invoke one of the suggestions from the General Guidelines (gentle heating, addition of excess HNO3, or decanting the solution away from the solid and adding extra HNO3 to the undissolved Cu) to finish the reaction. If you need to do any of these things to dissolve your copper, you should have a description of what you do in your lab notebook, including the amount of additional reagent added, if any.
5
Add the calculated amount of the reagent needed for the 2nd reaction in the copper cycle sequence. Add additional reagent as needed (see Specific Guidelines). Record amount of additional reagent in your notebook.
6
Carry out each of the next reactions in sequence.
7
At the end of the last reaction in the cycle, collect the copper by filtration. Carefully scrape the solid off of the filter paper and place it into a glass sample vial. Put your name on your vial, and put the vial in the designated container. At the start of the next lab, you will weigh the solid obtained from your experiment.