
Electrical Measurements
Introduction
In this section, electrical measurements will be discussed. This will be done by using simple experiments that introduce a DC power supply, a multimeter, and a simplified way to represent electric circuits using a schematic diagram.Mass and Electric Charge, Mass Flow and Electric Current
Matter has a number of properties, including mass and electric charge. Mass, M (measured in kilograms, kg), is a positive quantity. Electric charge, Q (measured in coulombs, C), on the other hand, can be either positive or negative. The net electric charge is the sum of the charge from the positively-charged ion cores and the negatively-charged electrons. Under ordinary circumstances, the positive and negative electric charges of a piece of matter cancel out, leaving it neutral. An increase in the net electric charge can occur either by increasing the amount of positive charge or by decreasing the amount of negative charge. For ordinary metals, the positive ion cores are immobile and the electrons constitute the "electric fluid." For constant mass flow rates, the mass of fluid that flows through a pipe equals the rate of mass flow (or mass current) multiplied by the time. Similarly, for constant charge flow rates, the charge, Q, that flows through a wire equals the rate of charge flow (or electric current, I, measured in amperes, A) multiplied by the time, t.Reservoirs and Capacitors, Pressure and Voltage, Pumps and Power Supplies
Water is often stored in a reservoir or a water tower. We may think of a reservoir as a tank of water that is under pressure. When two reservoirs at different pressures are connected by a pipe, the pressure difference causes water to flow through the pipe from the higher to the lower pressure reservoir. Similarly, electric charge can be stored in electrical reservoirs, called capacitors, which are metal plates that may be thought of as being under an electric pressure, called voltage. When two metal plates at different voltages are connected by a wire, the voltage difference causes an electric current to flow through the wire from the higher to the lower voltage plate. A high water pressure can be produced with a water pump attached to the reservoir, quickly replacing any water that is used, so that the water pressure does not decrease. The electrical equivalent of a water pump can be a single voltaic cell (an ordinary 1.5 volt D cell), a battery of voltaic cells (a 12 volt car battery), a power supply, etc.Pipes and Wires, Resistance, Circuits
Water flows easily within a pipe, flows slowly through soil, and does not flow at all through the walls of a pipe (unless the pressure in the pipe is high enough to cause the pipe to burst). Similarly, electric charge flows easily along metallic wires, flows slowly along moistened paper (this property is used in electrophoresis, which is employed for DNA fingerprinting), and does not flow at all out of the material that clads a wire, or from the wire to the air (unless the voltage of the wire is so high that it causes electrical breakdown). The cladding is said to have more electrical resistance than the wire. When we connect a hose from a high pressure to a low pressure reservoir, initially the water can flow easily. Eventually, however, the pressures equalize, and no flow can occur. If we want continuous flow through a pipe, and we do not have an infinite amount of water in our reservoirs, we put a pump in the pipe, and we recirculate the water by including a return pipe, thus forming a closed circuit. We do a similar thing with electricity when we use a power supply to drive electric current through a closed electric circuit.
Before we begin, we need to review a few new concepts that you will need to perform this lab.
Current, Voltage and Resistance
Although you are just beginning your study of static electric charges, when these same charges move around in a circuit they produce an electrical current which is the rate of flow of charge. The SI unit for current is the ampere (A) = 1 Coulomb/sec. By convention, the direction of the current is the direction of flow of positive charge, even though in metallic conductors the current is due to flow of negative charge (electrons) in the opposite direction. Because of conservation of charge, the current is the same at all points in a single loop circuit. At a branch point in a circuit, where the conducting path splits into two or more paths, the total current into a branch point equals the total current out of that point. To produce these moving charges we will use either a battery or a power supply, which uses chemical or electrical energy respectively to push these charges around a circuit. By convention, current flows out of the positive terminal of a battery or power supply and into the negative terminal. For current to be maintained in a circuit there must be a complete conducting path. Voltage is a measure of the electric potential difference between two points in a circuit and the difference in potential between two points in a circuit causes these electrical currents to flow. The SI unit for potential is the volt (V). Since the electrical force is a conservative force, the sum of the voltage increases and decreases around any closed loop is zero. Resistance is the property of a circuit element (conductor) to oppose current flow. Resistance is defined by where V is the voltage across the circuit element and I is the current flowing through it. If R is constant, the same for all V, then the circuit element obeys Ohm's Law. The SI unit of resistance is the ohm (Ω). The resistance of a resistive circuit element changes with temperature.Series and Parallel Circuits
Two resistors R1 and R2 are connected in series if all the current that passes through R1 also passes through R2. Therefore, for two resistors in series the current I1 through R1 is the same as the current I2 through R2, and this current is the same as the current, I, that enters the series network:I = I1 = I2.
The total voltage, V, across the series network is the sum of the voltages V1 and V2 across each resistor. That is, V = V1 + V2.
The equivalent resistance Rs of R1 and R2 in series is given by
Two resistors R1 and R2 are connected in parallel if the voltages V1 and V2 across each are the same and equal to the voltage, V, across the parallel network. That is, V = V1 = V2.
The currents I1 and I2 through each of the resistors add to give the total current, I, flowing into and out of the network: I = I1 + I2.
The equivalent resistance Rp of R1 and R2 in parallel is given by
This can also be written as
Ammeter and Voltmeters
Ammeters are used to measure current. An ammeter is connected in series with the circuit so that all the current being measured flows through the ammeter. Therefore, ammeters need to have very small resistance in order not to alter the current in the circuit. Voltmeters are used to measure voltages. A voltmeter is connected in parallel at the two points between which the potential difference is to be measured. Therefore, a voltmeter needs to have a large resistance so that very little current is diverted through it.
We will now perform several experiments to measure voltages and currents in series and parallel circuits and observe linear and nonlinear devices.
Apparatus
- 0-40 volt DC power supply
- 6 volt AC transformer
- Battery (D size)
- 12 volt light bulb and socket
- 150 and 700 ohm resistors
- Bare Nichrome wire (silvery-looking) and insulated copper wire on block
- Digital multimeter

Figure 1
Procedure
Please print the worksheet for this lab. You will need this sheet to record your data.
Measurement of Voltage
1
The power supply is a source of voltage difference. Locate the DC power supply at your lab table.
Press the POWER On/Off button to the ON position. Next, press the RANGE button to the IN (0.85 A) position (this sets the power supply to the 0-35 V/0-0.85 A range).
Rotate the voltage and current ADJUST knobs fully counterclockwise. Then set the maximum output current for this experiment by pressing the CC Set button, and while holding it down, rotate the current ADJUST knob clockwise until the AMPS display reads 0.20. Release the CC Set button. Do not move the current setting knob (CC Set) after this adjustment (unless given instructions in the lab).
Now rotate the voltage ADJUST knob clockwise until the volts display reads 5.0 volts.

Figure 2
Key for Figure 2:
-
1Voltage and Current LED display
-
2Voltage adjustment
-
3Current adjustment
-
4On/Off button
-
5Current Output Range button: Can choose between 0.85 and 1.5 A output current limit.
-
6Constant Current button: Allows switching from Constant Voltage output to Constant Current output.
-
7Positive Output jack
-
8Negative Output jack
-
9Common/Ground jack
2
The multimeter is a measuring device that is used to measure voltage differences, electric currents, and electrical resistances. It can measure other electrical properties as well. See Figure 3. At the top of the meter is an LCD (liquid crystal display), in the middle is the Function/Range switch (or dial), and at the bottom are four input sockets.
Caution:
The meter is particularly sensitive (and prone to blowing a fuse) when using the 200 mA Input jack (see 4 in the key of Figure 3).
The meter is particularly sensitive (and prone to blowing a fuse) when using the 200 mA Input jack (see 4 in the key of Figure 3).
To measure a given quantity, the dial must be at the appropriate setting, and the appropriate two input jacks must be employed. Thus, when turning the dial to change from one type of measurement to another (e.g., from voltage difference to electric current), one may have to change input sockets as well. If overloaded, the fuse can blow out.

Figure 3
Key for Figure 3:
-
1Function/Range switch: Selects the function and range desired.
-
2COM Input jack: Ground input connector.
-
3V-Ω Input jack: Input connector for volts, ohms, diode test, continuity, frequency and logic.
-
4200 mA Input jack: Input connector for currents up to 200 mA, Lx (Inductance), Cx (Capacitance).
-
520 A Input jack: Input connector for currents up to 20 A.
-
6ON/OFF button: Turns power to the meter on and off.
-
7HI/LO button: Selects high or low trigger level for frequency measurements.
-
8MAX button: Selects Maximum Reading Hold function.
-
9DC/AC button: Selects DC or AC type voltage.
-
103-1/2 Digit LCD with annunciators
Caution:
To protect itself, the meter buzzes under overload; if it buzzes, disconnect the meter leads!
To protect itself, the meter buzzes under overload; if it buzzes, disconnect the meter leads!
To protect the meter from overload when an unknown voltage or current is measured, the meter should first be set to the highest scale for that function. If the reading then is not large enough to give at least three significant figures, the scale should be switched (if possible) to one that permits an accurate measurement.
3
To turn on the multimeter, toggle the top left button on the meter until there is a display on the meter face. To set up the multimeter to measure DC voltage differences, ΔV, abbreviated as V on the meter, toggle the top right button to DC. Be sure that the meter display reads DC.
Turn the Function/Range switch to the voltage (V) range and dial setting to 20. The meter is now set to read voltages up to 20 volts DC.
Attach banana-banana leads to the common (COM) jack and to the voltage (V) jack.
4
Connect the multimeter leads to the + and – terminals of the power supply as shown. See Figure 4. Record the voltage readings on the multimeter (including sign) and the reading on the power supply's meter.

Figure 4
5
Switch the positive and the negative leads at the multimeter and again observe the voltage readings on the multimeter (including sign). Record the differences.
6
Switch the leads at the power supply terminals and record the voltage readings on the multimeter (including sign). Explain the significance of the sign changes in the DC voltage when the leads were interchanged.
The readings on the power supply's meter and on the multimeter may not be exactly the same. (Does your watch and your partner's watch read exactly the same time? Probably not.) The multimeter is expected to be more accurate.
7
Touch the multimeter leads to the ends of the battery (D cell) and record the voltage. Switch the leads and record the voltage. Explain the significance of the sign changes in the DC voltage when the leads were interchanged.
8
Switch the multimeter to measure AC voltage. Take the transformer (which changes the wall voltage from near 120 volts to a safer value), plug it in, and record the AC voltage from the transformer. Switch the meter leads and again record the AC voltage on the multimeter. Is there a sign associated with AC voltage?
Unplug the transformer. Disconnect the multimeter from the transformer.
Resistors (Linear (Ohmic) Device)
1
Turn down the voltage of the power supply (ccw to zero volts). Connect the power supply to the 700 ohm resistor on the circuit board. (Do not readjust or change the current setting.)
2
Set the power supply to 1 volt, and record the current through the resistor (by inserting the multimeter in series into the circuit to measure the current). Repeat with the power supply set to 2, 3, 4, and 5 volts.
3
Using Excel, plot your current data points vertically and the voltage difference horizontally onto a page of an Excel worksheet. Use Excel to find the slope and the y-intercept of the best fit to your data.
4
If you get results as expected, the data will nearly lie on a straight line through the origin: I = ΔV/R.
The inverse of the slope is called the electrical resistance, R. Resistance is a quantitative measure of load such that for a given voltage difference—the larger the resistance, the smaller the current. From the inverse slope of your data, estimate R for your 700 ohm resistor.
5
From your data, would you deduce that the resistor is a linear device? Explain.
Light bulbs (Nonlinear Device)
1
Look at the external metal connections on the light bulb. There are two connections: the area of the threaded section and the tip. These are connected internally to the filament, which you can see. (The ratings of a light bulb generally are given somewhere on the bulb itself. If you can find them, write them down.) Sketch the diagram of the bulb and draw a circuit (using a battery symbol) that could be used to light the bulb. What does it take to light the bulb?
Checkpoint:
Have your TA check your diagram.
Have your TA check your diagram.
2
Before proceeding, make sure the power supply is still set to 5 volts output.
Caution:
This is important to prevent burning out the bulb filament.
This is important to prevent burning out the bulb filament.
3
Attach banana-banana leads to each jack of the light socket base. Take the other end of one of the banana leads and attach it to the positive terminal of the power supply. (Leave the other lead alone.) Record whether or not the bulb lights up. Record the voltage (and current, if displayed) from the power supply's meter.
4
Take the other end of the second banana plug lead and also attach it to the positive terminal of the power supply. Record whether or not the bulb lights. Record the voltage and current, if any, from the power supply's meter.
5
Connect the bulb to the power supply. Record whether or not the bulb lights up. Record the voltage and current displayed on the power supply's meter. (Has it changed now that the bulb has lit? If it hasn't lit, ask the lab instructor for help.) If the bulb lights, we say that the circuit has been completed.
6
Remove the banana plug leads from the light socket base, and reverse them. Record the voltage and the current. What happened to the light bulb? Is the voltage and current different from the ones in part 5?
7
We now perform a more quantitative study of properties of the light bulb. TURN THE POWER SUPPLY VOLTAGE TO ZERO but do not turn off the power supply. Do not readjust the current setting (CC Set). We will use the multimeter to measure the DC current through the light bulb as a function of the applied voltage. To do this, we must connect the multimeter in with the light bulb, so that the same current passes through both. This is your first current measurement: since it is easy to blow a fuse on the current setting, follow instructions carefully.
8
Hook up the circuit as shown in the schematic in Figure 5. Convince yourself that the detailed circuit corresponds to the less-detailed schematic. Set the multimeter to the DC current scale with the highest reading. This will be the 20 A range. Don't forget to connect the leads to the appropriate sockets.
Checkpoint:
Do not turn up the voltage on the power supply until your TA checks your circuit.
Do not turn up the voltage on the power supply until your TA checks your circuit.

Figure 5
9
After being given the go-ahead by your TA, turn the power supply voltage to 2 volts. Record whether or not the bulb lights. (If it doesn't, ask your lab instructor for help.) Record the voltage reading on the power supply meter and the current reading on the multimeter.
10
Including the above measurements for 2 volts, measure the current and indicate the relative brightness for 2, 4, 6, 8, 10 and 12 V.
Caution:
Do not exceed 12 volts.
Do not exceed 12 volts.
11
In tabular form on a new worksheet in Excel, record the voltage readings on the power supply meter, the current readings on the multimeter, and what happens to the intensity of the light bulb for the values above.
12
Using the Excel worksheet from step 3 of the Resistor section, plot your current data points vertically and the voltage difference horizontally. This choice of axes is made because the voltage difference is the independent variable; it causes the current. Do not forget to label the axes. If you get results as expected, the data will not lie on a straight line: the response (the current) caused by the voltage difference is not linear.
This can be traced to the fact that the tungsten filament in the light bulb is heating up. Find a reference (textbook, website, etc.) about a tungsten filament and review the explanation as to its properties.
13
Measure the current at a nonzero voltage of your choice that is so low that the bulb doesn't light. The current should not be zero. Just because the bulb isn't lit doesn't mean that something isn't happening; the intensity of the bulb is not an accurate way to study electricity. This current may be read using the power supply meter.
Resistance of Various Materials
1
Turn off the power supply and disconnect all the leads from the equipment and the components.
2
We now use the multimeter to measure the resistance of the 700 ohm resistor. Within the multimeter, there is a small battery and a circuit that provides a small fraction of that voltage. When the dial and input jacks are selected to measure resistance, the multimeter applies a small amount of the battery's voltage to the object being studied and measures the current through the object. Then using I = ΔV/R
the multimeter converts the current to resistance, which is displayed.
3
Set the multimeter dial to the resistance range of 200 k.
4
Connect the two multimeter leads to the 700 ohm resistor. Readjust the multimeter dial to the resistance range that displays the most significant figures. Record the multimeter reading. Compare this reading with the result determined by the inverse slope of your graph, and with the nominal value of 700 ohm.
5
The multimeter in "resistance measuring mode" will now be used to measure the resistance of several different objects. Record these resistances in the table as requested. Construct a table listing the materials and their resistances in order of increasing resistance.
-
aThe light bulb
-
bThe bare, silvery, Nichrome wire
-
cA narrow (1/16-1/8 inch) line of graphite (two to three inches long) that you draw with a pencil on a sheet of paper (You have to put down a fair amount of graphite to get a decent measurement.) Determine how the resistance changes on halving the separation of the multimeter leads. (Don't bother to be very precise.) Determine how the resistance changes on making the line thicker (you can think of this as making the line wider in the direction normal to the length of the line on the paper).
-
dYour body: Hold the multimeter leads with your fingers when they are dry. Repeat with your fingers moistened.
-
eA piece of paper: Use the highest resistance scale. Moisten the paper and measure the resistance across the moist region.
-
fAir: Use the highest resistance scale. Keep the leads about 1 mm apart. Record if the resistance is too high or too low to be measured.
-
gThe insulated copper wire: Record if the resistance is too high or too low to be measured.
-
hThe 150 ohm resistor
Resistors in Series
1
Connect the 150 ohm and the 700 ohm resistors as shown in Figure 6 (they should not be connected to anything else!). They are said to be in series because the current must first pass through one and then through the other. The current encounters the resistance of each resistor, so the net resistance should increase and the current should go down.

Figure 6
2
Measure and record the resistance of this combination with the multimeter in the Ohm position.
3
Make sure the power supply voltage is set to zero. Connect the power supply to the series resistor combination as in Figure 7. Set the power supply to 5 volts. With the multimeter, measure and record the voltage differences ΔV700 and ΔV150 across each resistor, and the voltage difference ΔV across the combination.

Figure 7
4
Now set the power supply voltage to zero. Disconnect the multimeter from the circuit.
5
Does ΔV = ΔV700 + ΔV150 or ΔV = ΔV700 = ΔV150
better represent your data?
6
With the power supply voltage set to zero, connect the multimeter in series with the resistors as shown in Figure 8. You will now measure the current between various junctions. Be sure to set the multimeter to the 200 mA DC current range and connect the mulitmeter leads to the correct jacks.
Checkpoint:
Before proceeding, have your TA check that you have the correct setup: a fuse may blow if the meter is not connected to the proper points in the circuit.
Before proceeding, have your TA check that you have the correct setup: a fuse may blow if the meter is not connected to the proper points in the circuit.
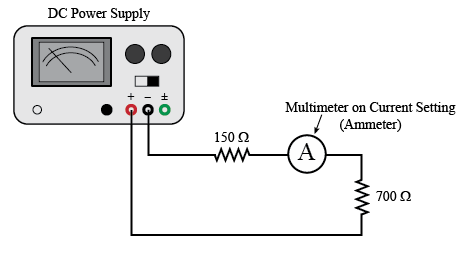
Figure 8
7
After being given the go-ahead by your TA, turn on the power supply and set it to 5 volts. Measure the current in the wire between the two resistors, the wire between the 700 ohm resistor and the power supply, and the wire between the 150 ohm resistor and the power supply. Verify that these three currents are equal.
8
Measure and record the current flowing through the two resistors. In Table 4, record the current reading on the multimeter. Repeat for power supply voltages of 2, 4, 6, 8, 10, and 12 volts.
9
When you have completed these measurements, set the power supply voltage to zero. Now use Excel to plot your data, with current on the vertical axis and voltage on the horizontal axis. Use Excel to find the slope of the straight line that best fits your data and record your result, including units.
10
Use Ohm's law and the slope from your graph to calculate the equivalent resistance, Rs, of the two resistors in series, in units of ohms (Ω). Record your result.
11
How does this compare to the value of the two resistors used in this series circuit?
Resistors in Parallel
1
Disconnect the power supply from the resistance circuit. Hook up the two resistors (using the banana-banana leads) as in the schematic of Figure 9. The resistors are said to be in parallel because they provide parallel paths for current flow. For a given voltage from the power supply, the net current flow should go up, and thus the load (resistance) should go down.
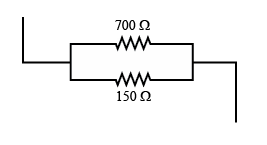
Figure 9
2
Measure and record the resistance of the 150 and 700 ohm resistors in parallel with the multimeter in the Ohm position.

Figure 10
3
With the power supply voltage set to zero, connect it to the parallel resistor combination as in Figure 10. Adjust the power supply to 5 volts. Set the multimeter to measure at least 5 volts and use it to measure the voltage difference, ΔV, across the combination and across each resistor. Record the values. Is there any difference between ΔV, ΔV700, and ΔV150?
4
Does ΔV = ΔV700 + ΔV150 or ΔV = ΔV700 = ΔV150
better represent your data?
5
Turn off the power supply and hook up the multimeter to measure the current as shown in Figure 11. Be sure to set the range on the meter to 20 A. This can be adjusted later, if needed. Use the appropriate jacks on the meter.
Checkpoint:
Have your lab instructor check that you have the correct setup: a fuse may blow if the meter is not connected to the proper points in the circuit.
Have your lab instructor check that you have the correct setup: a fuse may blow if the meter is not connected to the proper points in the circuit.

Figure 11
6
After being given the go-ahead by your TA, turn on the power supply and set it to 5 volts.
7
With the multimeter, measure and record the currents I150 and I700 flowing through each resistor and the total current, I, flowing through the power supply.
8
When you have completed these measurements, set the power supply voltage to zero and disconnect the multimeter from the circuit.
9
Does I = I150 + I700 or I = I150 = I700
better represent your data?
10
Continue with the parallel resistor network. With the power supply voltage set to zero, connect the multimeter to measure the total current, I, flowing through the power supply. Set the multimeter to the 200 mA DC current range.
Checkpoint:
Before proceeding, have your lab instructor check that you have the correct setup: a fuse may blow if the meter is not connected to the proper points in the circuit.
Before proceeding, have your lab instructor check that you have the correct setup: a fuse may blow if the meter is not connected to the proper points in the circuit.
11
After being given the go-ahead by your TA, turn on the power supply and set it to 2 volts.
12
In Table 5, record the current reading on the multimeter. Repeat for power supply voltages of 4, 6, 8, 10, and 12 volts.
13
Use Excel to plot your data, with current on the vertical axis and voltage on the horizontal axis. Use Excel to find the slope of the straight line that best fits your data and record your result, including units.
14
Use Ohm's law and the slope from your graph to calculate the equivalent resistance, Rp, of the two resistors in parallel, in units of ohms (Ω). Record your result.
15
How does this compare with the result described in the lab introduction for adding two resistors in parallel?