Create Image Map Questions

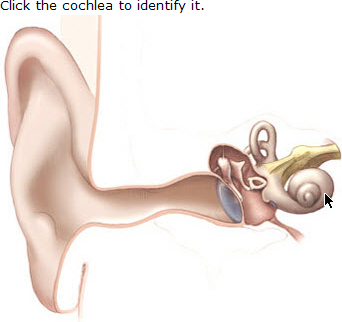
An image map question requires your students to identify something in an image by clicking the image. Image map questions are particularly useful when you want your students to identify a named anatomical part in an illustration or geographical feature in a map.

  1. Create the image file that you want to use for your question.
    Best Practice Keep the image dimensions smaller than 800 by 600 pixels to ensure that the image is displayed in the question without scrolling.
  2. Click Questions > Create. The Question Editor opens.
  3. In Name, type a name for the question.
  4. In Mode, select Image Map.
  5. In Question, type your question.
  6. Click My Files under Page Tools.
  7. If you have not already uploaded your image to WebAssign, use the following steps to do so.
    1. Click import icon Import File.
    2. Click Browse or Choose File, depending on your browser.
    3. Navigate to the file you want to upload.
    4. Click Open or Choose, depending on your browser.
    5. Click go.
      Note Uploading a large file might take some time, especially with a slower Internet connection.
  8. In the My Files window, navigate to the file you want to use and select its check box.
  9. Set Paste location of file (selected below) as to ID Only.
  10. Set Destination Field to Question.
  11. Click go.
    The unique WebAssign ID number for the image is added to Question on a new line.
  12. Edit the line with the image ID number to add an answer placeholder string for the image map question like the following:
    <_ src="ID">

    where ID is the ID number of the image you want to use. You can move this answer placeholder string to wherever it should be displayed in the question.

  13. Click Redisplay.
    The question and image are displayed in the Display section of the Question Editor.
  14. Click Coordinates below the image.
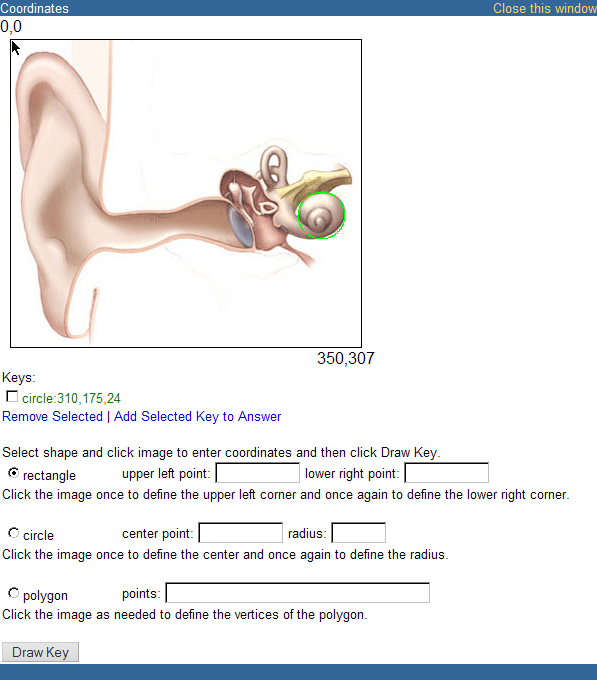
  15. In the Coordinates window, select a shape and define the boundaries for a part of the image that your students should click to correctly answer the question.
    Note Each shape defines a single key for the answer. You can define multiple keys to allow students to click any of several areas of the image for a correct response.
    • To add a rectangular key, click rectangle. Click the image to set the upper left point of the key. Click the image to set the lower right point.
    • To add a circular key, click circle. Click the image to set the center of the circle. Click the image at the edge of the circle to set the radius.
    • To add a polygonal key, click polygon. Click the image at each vertex of the polygon, specifying adjacent vertices consecutively.

    Click Draw Key to preview the key on your image. The key you defined is drawn in bright green on the image, and its definition is added to a list of Keys below the image.

    If a key is not correct, select its check box and click Remove Selected.

    Tip To fine-tune the dimensions for a key that is not quite correct, add a new key of the same shape. Using the not-quite-correct key as a reference, type the new coordinate values instead of clicking the image.

    Repeat this step until you have defined all the keys you need for the question.

    draw key example
  16. When the keys are drawn correctly on the image, select the check boxes for the keys you want to use and click Add Selected Key to Answer.
    The Coordinates window closes and the keys are added to Answer.
    Important

    If you need to use the Coordinates window more than once to add keys to your question, you will need to manually edit the keys in Answer to ensure that all of the keys for each question part are listed on a single line and are delimited with the {tab} characters.

    This is necessary because although all of the keys for a question part must be listed on the same line, each time you click Add Selected Key to Answer, the keys are added on a new line.
    Note
    • If an answer extends beyond the right side of the Answer box, it is wrapped to the next line, but it is still considered a single line so long as you do not press ENTER.

    If you need to manually edit the keys in Answer, the following reference information about how image map keys are specified might be useful:

    Shape

    Key

    Rectangle

    rect:left_x,top_y,right_x,bottom_y

    Circle

    circle:center_x,center_y,radius

    Polygon

    poly:x1,y1,x2,y2,x3,y3...
  17. Optional: Type a Solution.

    The solution helps your students understand the steps they need to take to determine the correct answer to the question. Your assignment settings specify when to show the solution.

  18. Click Test/Preview to test the appearance and behavior of the question. See Test Questions.
  19. Click Redisplay to show certain kinds of errors in the Display section of the Question Editor. Make any needed changes to your question.
  20. Optional: Click Show Additional Information and change the question's sharing permission or add descriptive information.
    • By default, other instructors can use your question only if you provide them with the question ID, and only you can edit the question or find it in search results. To change the permission, see Share Questions With Other Instructors.
    • If you make your question publicly available, you might want to provide descriptive information to help others search for it. See Add Search Metadata to Questions.
  21. When your question displays and functions correctly, click Save.

    WebAssign assigns it a unique question ID (QID), which is displayed in parentheses after the question name.

    You can use your question in an assignment and see it in your My Questions list only after it is saved.

Example Image Map Question

The following table summarizes an actual question.

QID

1159575

Name

Template2 2.MAP.01.

Mode

Image Map

Question

Click the cochlea to identify it. <br>
<_ src="92012">

Answer

circle:310,175,24

Display to Students

Question as displayed to students