Create Questions with the Question Editor

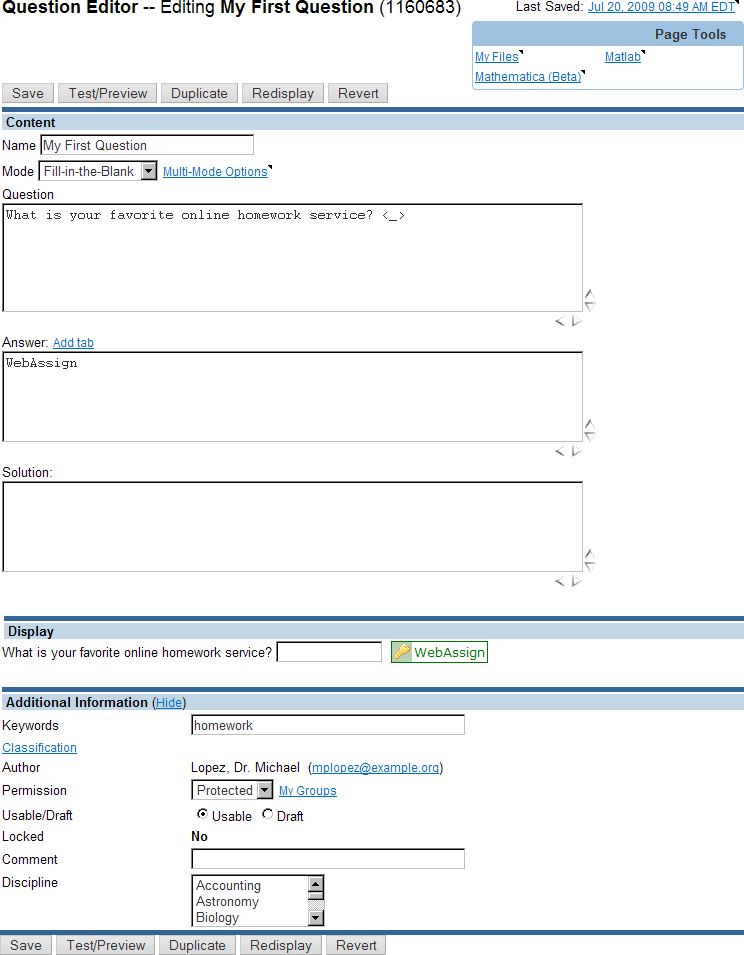
To create or edit questions in WebAssign, you use the Question Editor.

Note Although you use different procedures and options when creating different kinds of questions, the following steps describe the general procedure for creating questions in WebAssign. Refer to other sections for information about specific question types.
  1. Click Questions > Create. The Question Editor opens.
    Tip Click Questions > My Questions and click Edit or Duplicate for a question.
    Question Editor window
  2. In Name, type a name for the question.

    Use the Name field to specify a descriptive name for the question. The name can be up to 50 characters long, and helps you to identify the question without having to view it.

  3. In Mode, select one of the question modes to define the basic behaviors for your question.

    Mode

    Description

    Multiple-Choice

    Lists mutually exclusive choices with only one correct response.

    Multiple-Select

    Lists non-exclusive choices, allowing your students to select all the choices that apply.

    Numerical

    Provides a box for your students to type a numerical response that is scored for numerical accuracy and, optionally, for correctly specifying units, significant figures, or decimal places.

    Fill-in-the-Blank

    Provides a box for your students to type a short response that is scored by comparison with one or more answers.

    Essay

    Provides a box for your students to type a response of any length. Essay questions must be manually scored.

    Symbolic

    Scores mathematical expressions by comparing your students' responses to the key with variable substitution.

    Algebraic

    Scores mathematical expressions by comparing your students' responses to the key algebraically.

    NumberLine

    Provides a number line on which your students place points or graph their response.

    Image Map

    Displays an image that your students click to identify something in the image.

    Graphing

    Provides a coordinate plane on which your students graph their response.

    File-Upload

    Allows your students to upload a file for their response. File-upload questions must be manually scored.

    Java

    Displays a Java applet or other web-based simulation or tool that provides the question and scores your students' responses.

    Poll

    Using any of the other modes, poll questions gather information but score all responses as correct. See Create Multi-Part and Tutorial Questions.

  4. To create a multi-part question that uses more than one question mode, click Multi-Mode Options.
  5. In Question, type the question you are asking your students to answer.
    Depending on the type of question you are creating, you will usually add an answer placeholder string <_> to specify where your students will specify their responses.

    You can use HTML tags and CSS style attribute values in your question to format its appearance, or you can use WebAssign tags to add formatting or boilerplate text. You can also include images, videos, sound files, or links to documents.

    Tip To resize the Question, Answer, or Solution boxes, click the horizontal image of buttons or vertical image of buttons resize buttons. This does not affect the display size of the question in an assignment. Resizing these fields affects only the question you are editing, but the field sizes are saved with the question.
  6. In Answer, specify the answer key for your question. Often, you will specify distractors or options configuring your question's behavior.
    Important The information you specify in Answer varies significantly based on the selected question Mode.

    For multiple-choice and multiple-select questions, you can use HTML tags and CSS style attribute values to format answer choices, or include images, videos, sound files, or links to documents.

  7. Optionally, type a Solution.
    The solution helps your students understand the steps they need to take to determine the correct answer to the question. You can configure display of solutions in your assignment settings.

    You can use HTML tags and CSS style attribute values in your solution to format its appearance, or you can use WebAssign tags to add formatting or boilerplate text. You can also include images, videos, sound files, or links to documents.

  8. Click Test/Preview to test the appearance and behavior of the question.
  9. Click Redisplay to show certain kinds of errors in the Display section of the Question Editor. Make any needed changes to your question.
  10. Optionally, click Show Additional Information and change the question's sharing permission or add descriptive information.
    • By default, other instructors can use your question only if you provide them with the question ID, and only you can edit the question or find it in search results. To change the permission, see Share Questions With Other Instructors.
    • If you make your question publicly available, you might want to provide descriptive information to help others search for it. See Add Search Metadata to Questions.

    The Author and Locked information cannot be changed. Author displays your name and email address. Locked indicates whether or not the question has been included in a scheduled assignment. This does not prevent you from editing the question, but you should not edit locked questions except to correct errors.

  11. When your question displays and functions correctly, click Save.
    WebAssign assigns a unique question ID (QID), which is displayed in parentheses after the question name. You can use your question in an assignment and see it in your My Questions list only after it is saved.
Tip
  • To discard the changes in the Question Editor and load the last saved version of the question, click Revert.
  • To view the history of saved changes for the question, including the date, time, and user, click the Last Saved date.